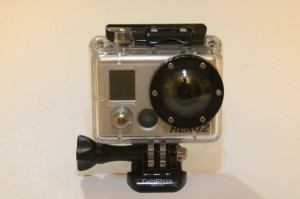
I had the opportunity to try out the GoPro Hero2 camera this summer. For those of you who don’t know about the new generation of mini-video cameras, it’s time to get outside and have a look.
The Outdoor edition GoPro came with a set of mounts including a head strap mount and both stick-on and removable helmet strap mounts. The camera also comes with a waterproof and windproof case with two optional backs (one for less than 100 mph and one greater than 100 mph – in case you ride your bike really fast!).
The camera is small and light, which is the beauty of the GoPro. Measuring 2.25” x 1.5” and weighing only a few ounces, the camera is barely noticeable when mounted on top of a helmet. The helmet strap is easy to use and one can remove it quickly when you don’t want to use the camera. Retail price is suggested at $299. With an optional WiFi remote, you can control the camera from a distance. For cyclists, an optional handlebar mount is available. This may result in cleaner video, especially if you are shooting road riding in a pack of cyclists.
The camera has a minimalist approach to the controls. There are only two buttons, a power/mode button, and a record/shutter button. The mode button combined with the shutter button lets you cycle through the various options for taking video (1080p, 960p, 720p) or photos (one shot or burst mode and 5-11 mp). Once the mode is chosen, the shutter button lets you start and stop recording or take pictures with a simple click. This is handy when combined with the button on the case since you can record or shoot by touch without taking off your helmet.
Charging the camera is simple – just use the mini-USB cable and plug it into your computer. Images and video are recorded to an SDHC card. With a 32GB card, up to 6 hours can be recorded at 960p.
I tried out the GoPro on several rides. It took very little to get used to it. I shot a critical mass ride, a ride through town, and a few mountain bike rides. The easy to find shutter button allows one to turn the camera on or off while riding or stopped without removing your helmet. I did make a mistake or two on one ride where I had it set on still photo rather than video. This was a simple beginners mistake that I didn’t make again.
When using the camera mounted on your helmet, it’s important to look forward, and to remember that every time you twist your head or look side to side, the viewer will see a jumbled picture. If you do, slow and deliberate movements lead to a better video. Also, you want to spend a little time getting the angle right so that the video centers on the road or trail ahead. This is simple to do with a quick adjustment on the helmet mount.
Once you shoot your movie, you probably want to edit it. I used iMovie for the Mac. This was easy to use, although rendering the movie takes a little bit of time. GoPro’s website has a free download of CineForm Studio. I did not try this, but from the description, it seems like an easy to use program.
To see one of the videos I shot, visit youtube.com/cyclingutah . It’s a first effort with more to come.
All in all, I would recommend the GoPro Hero2. It’s light, fun, and easy to use.
[At press time, GoPro just released the Hero3. The new Hero3 is smaller and lighter and comes in three versions. And, as with the evolution of all electronics, it’s faster with improved performance and a better lens. Generally, the new version operates similarly to the Hero2.]


