By Lou Melini — Mention a kickstand to a bike snob and you will most likely receive a very succinct unflattering response. However talk to someone with a loaded touring bike, or a commuter bike that is about to have its’ panniers packed with groceries and you will be told about the utilitarian necessity of a kickstand. I know you are going to say that I could simply lean my bike against something. By saying that, it shows that you have never used a kickstand. Once you use a kickstand for a period of time you will find that it becomes a needed accessory.
The insults thrown at kickstands have resulted in an absolute dearth of kickstands in stock in an American bike shop save the rare bike shop. In Germany I measured 12 square feet of display space allotted to kickstands in a very large bike shop. Probably 70% of the 2000 bike inventory in that shop was made up of heavy bikes that came standard with lights, racks, fenders and kickstands, so having after-market kickstands in that environment was not only appropriate but a necessity. Ask an American bike shop employee for advice or a recommendation for a kickstand and you will probably receive a shrug and be shown a page in a Quality Bike Parts catalog. My son laughs when I get excited over purchasing a new kickstand. I have used 3 styles of kickstands over the years, which I believe constitute all categories of kickstands. There are some minor variations within each category.
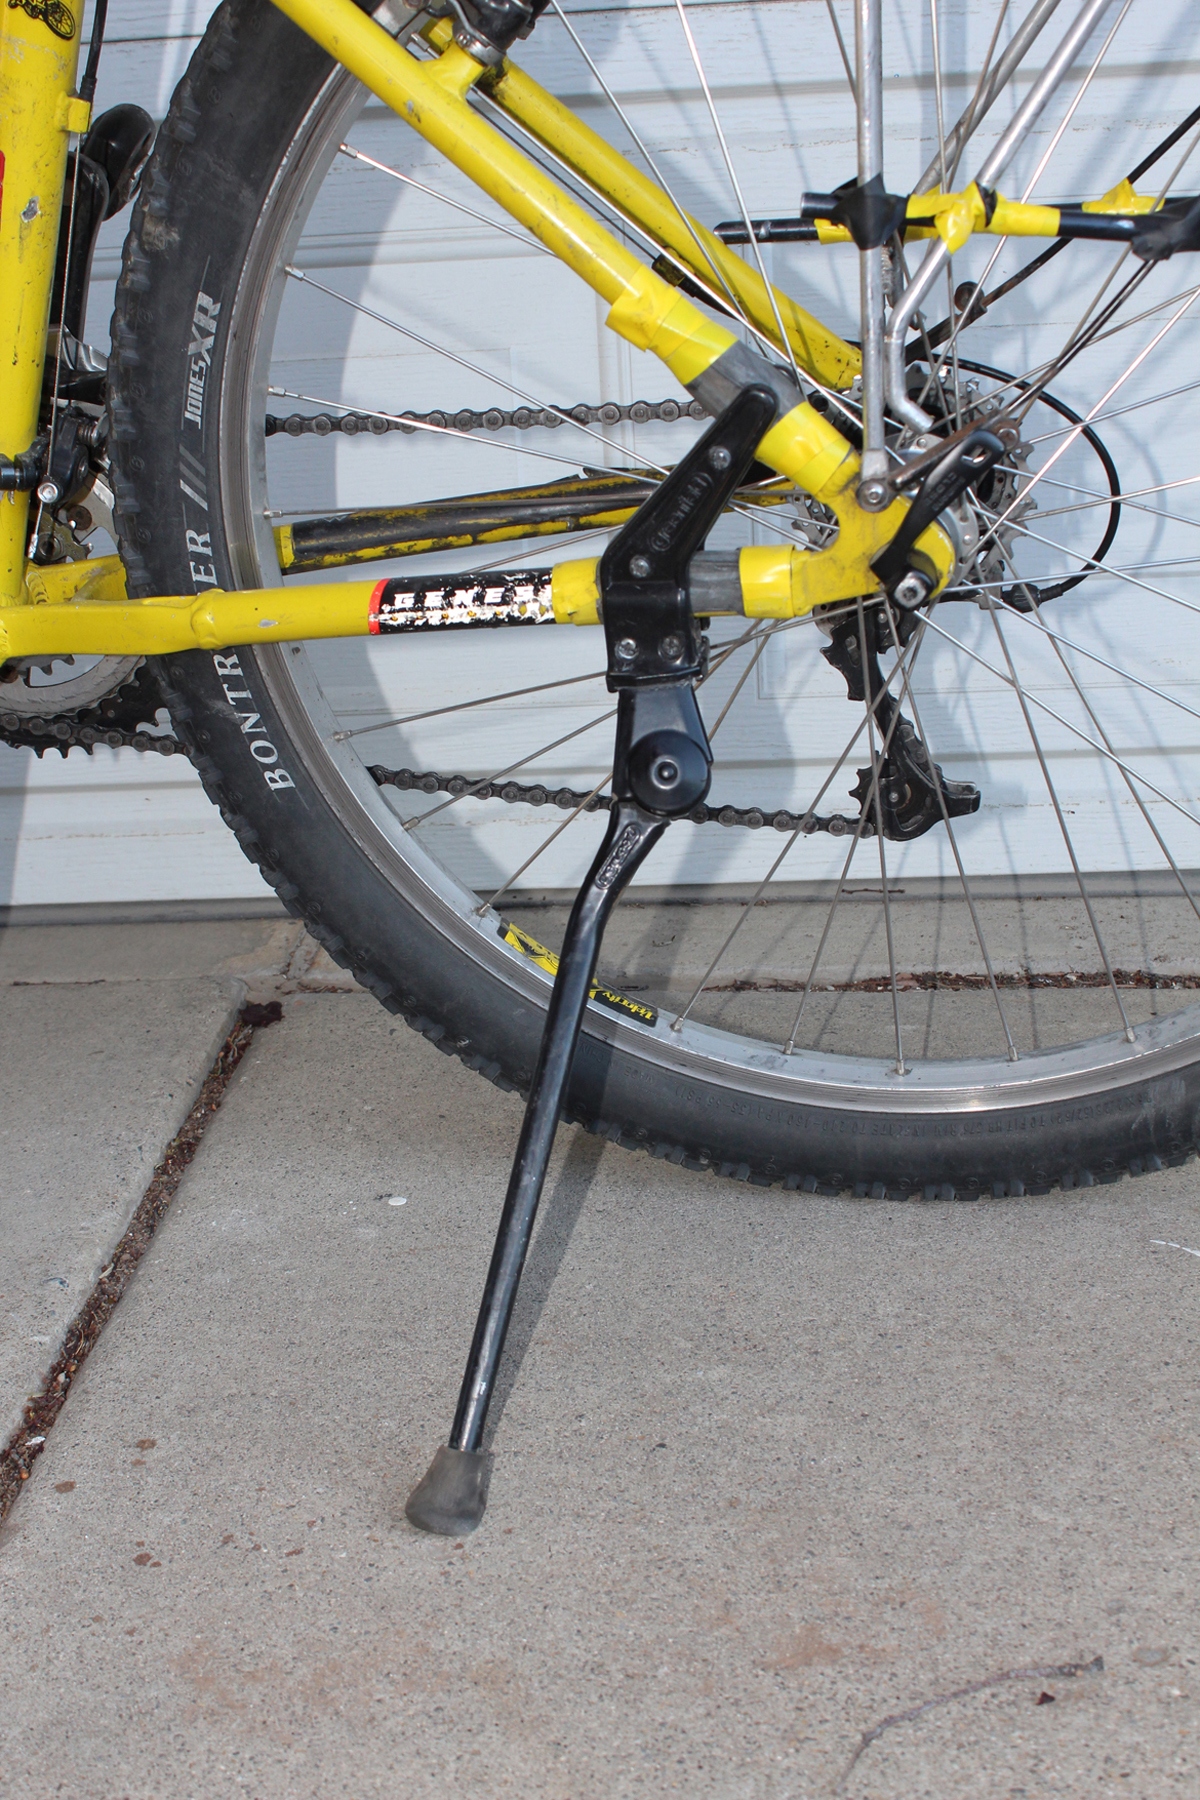
The first style kickstand I ever used is rear mounted. Basically this clamps to the seatstay and chainstay of your bike via 2 arms and several screws. This is the easiest to use. Simply flick the kickstand arm down with your foot and lean the bike. You can buy adjustable and non-adjustable legs but I personally do not have a preference, as both seem to work well. I have packed over 50 pounds of groceries in my rear panniers and on the rack without a problem. You will need to pack the kickstand side pannier first. There are a few downsides of this kickstand. If you want to mount a Burley style trailer to your bike the kickstand will get in the way. In addition, disc brakes may make the distance between the stays of your bike too wide for this style kickstand. There is really no maintenance except an occasional need to tighten the screws. Locktite will help. I have used a Greenfield brand (non-adjustable) and a TranzX kickstand; each of which cost me around $17.
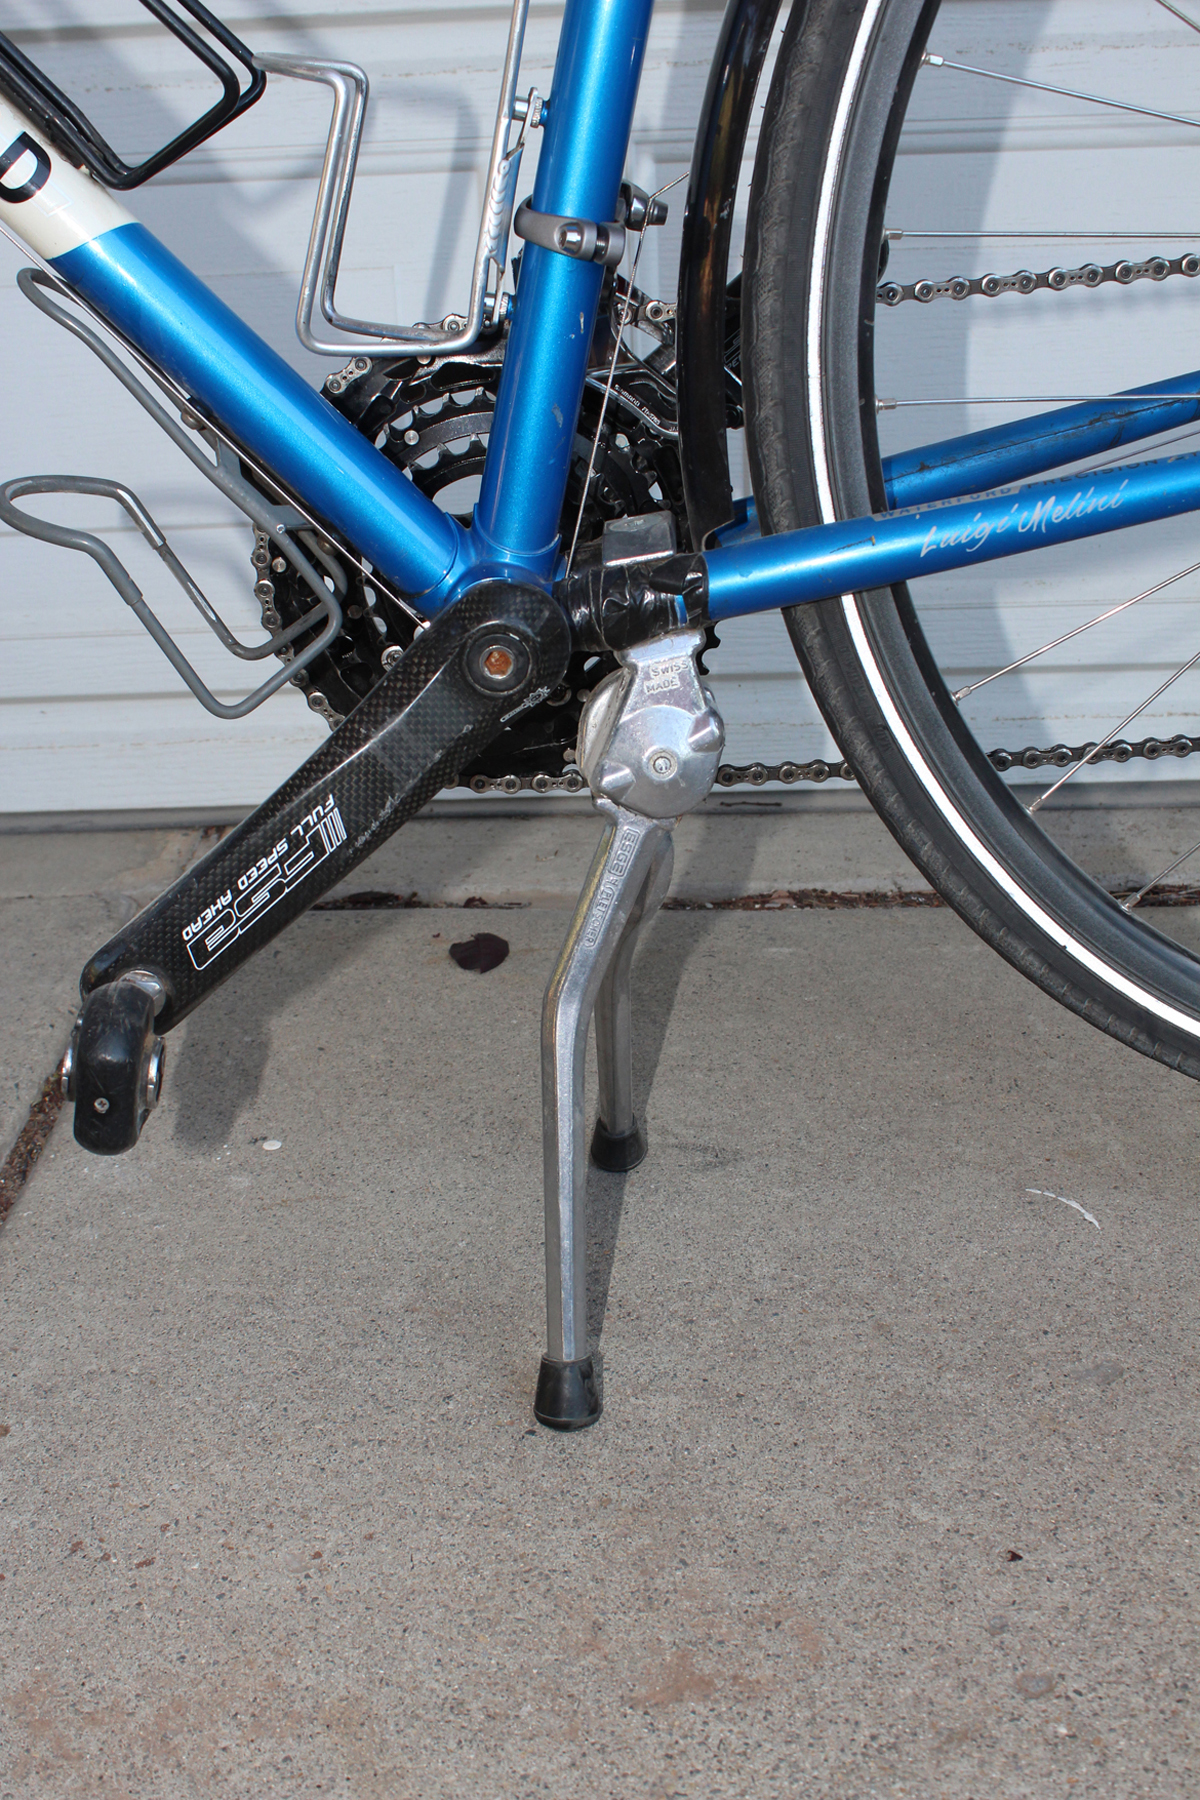
The next style I purchased for my touring bike fits under the chainstay. It has 2 legs that swing down stabilizing the bike in a vertical position. This kickstand clamps to the top and bottom of your chainstays in front of the rear tire. For this style of kickstand you push down the legs of the kickstand and then lift the bike onto the extended legs. The primary advantage of this style is that I can work on my bike for routine maintenance during an extended tour. It is quite stable with the 45 lbs of camping gear carried in my front and rear panniers and on the rear rack. My kickstand is Swiss made Pletscher model so it is a little pricey at $45 but I figured that being able to work on my bike was worth a little extra and Swiss quality isn’t cheap. I did assume wrong that Swiss quality would make it indestructible as the return spring broke after about 7,000+ miles. There is also a Greenfield kickstand that uses similar technology that I have not used.
The legs of the Pletscher kickstand have markings up to 300mm. You then cut the legs to fit your bike, though I am unsure if this is absolutely necessary. Simply measure from the middle of your chainring bolt to the floor (270 mm for my touring bike) and cut the legs at the 270 mm mark (my bike) on the kickstand legs. Rivendell bikes (www.rivbike.com/product-p/k21.htm) have a detailed instruction on how to cut the Pletscher kickstand. Rivendell also have rubberized mounts (to protect the chainstays) and “feet” for the kickstand legs. You can also use handlebar tape or an old tube to protect the chainstays and for the legs you can buy 0.5 inch rubber furniture “feet” (from Ace Hardware). You can also buy a single leg under the chainstay Pletscher kickstand.
Using this kickstand as a work stand or using it to keep the bike upright while changing a flat tire is remarkably more convenient when touring. It beats turning the bike upside -down or finding a low branch to hook the saddle to. I do have to carry a separate 6mm wrench for the kickstand, as my multi-tool is too bulky to fit in the tight space. My wife’s kickstand seemed to come loose too frequently, but has not come loose since I reinforced the kickstand body to the chainstay bridge with zip-ties.
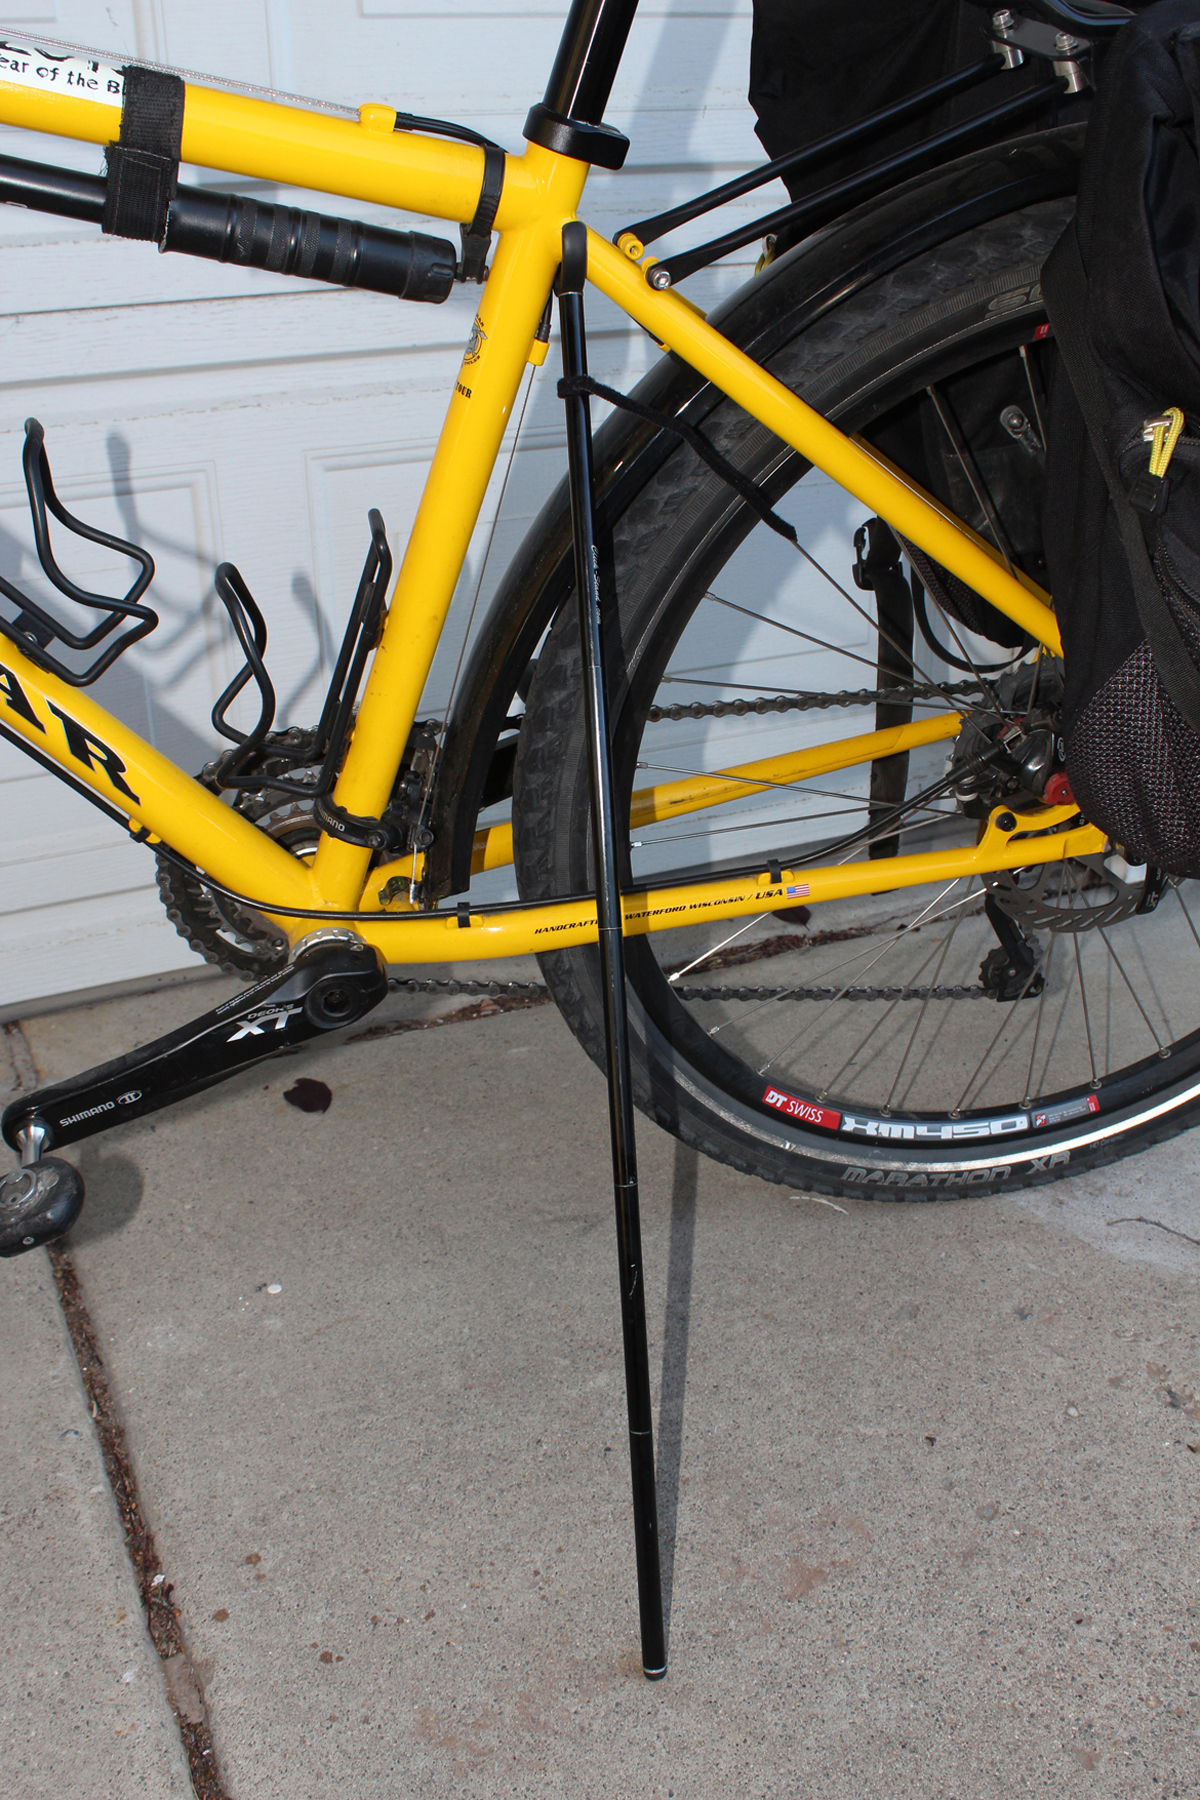
The third style of kickstand I needed to purchase because my new commuter bike doesn’t accommodate kickstands, a story as to why I can discuss over a cup of coffee sometime. So if you have a bike that will not fit either of the above styles of kickstand then you will need a non-attached bike stabilizer. (Or if you want the function of a kickstand but wouldn’t be caught dead with one on your bike) The Click-Stand (Click-Stand.com) is basically a tent pole with a U-shaped attachment. The “U” is placed under the top tube or some other part of the bike and the bike leans into the tent pole. I’ve had a number of European bike travelers that have made their own bike stabilizer. The Click-Stand that I have folds down to 6 inches. It works well. After receiving it I had a large grocery list that I confirmed the weight to be 50 pounds. The entire shopping load was put into my panniers and strapped to the rear rack. With a bit of skepticism, one small adjustment, the bike held up. Good product!
I purchased my Click-Stand.com for $38. Prices vary a little for the lighter or heavier duty model (I have the heavy duty) and if you want a 4, 5, or 6 piece Click-Stand. Other than length, I’m not sure if there are any advantages for the 4, 5, or 6 piece lengths. I bought the middle-of-the-road 5-piece length which cost and extra $3 over the 4 piece. You can also buy an accessory to mount the Click-Stand to your water bottle bolts.
The website provides a detailed instructions on how to measure your bike when purchasing the Click-Stand as each are custom made for your bike. Tom at Click-Stand is very customer service oriented and will help you. The key to the stability of the Click-Stand is keeping the front brake engaged when using the Click-Stand. You will be sent 3 small bungee-cord loops to secure your brake with your order. Obviously this is the least convenient of the 3 types of kickstands that I own. I remove it from my pannier, assemble the shock-corded pole pieces similar to a tent pole, place it appropriately under my bike, and then lock the front brake. The Click-Stand is well worth the small amount of time to engage it, perhaps 10 seconds, for a simple quality product.
Be bold, trend setting and practical. Get a quality kickstand for your commuter or touring bike.
I have a Simple one giant cruiser! I have a kickstand – massload dka56s! The spring broke on inside! I’m trying to fix it! I contacted massload with no help to get the diagram or schematics just to see how the spring goes back together! No luck! Dose anybody help me find A diagram of this kickstand? Please help! Thank you. Johnny