By Tom Jow
One of the hottest trends in mountain biking right now is SRAM’s 1 x 11 single ring drivetrain. It is so hot that since it’s release it has spawned 3 mountain bike group sets, a cyclocross group and rumours of a road group. Also grown from the popularity of the 1x drivetrain is a number of conversion parts to upgrade a multi-ring 10 speed drivetrain to a 1 x 10 setup. In this article I review the eThirteen 42t rear cog and a RaceFace 30t narrow-wide chainring I installed on my bike last month.
The Installation:
The installation process is simple and straightforward. Remove the cassette. Install the new cog behind the old cassette and remove either the 17 or 15 tooth cog. Remove the chainrings and install the new one. Then remove the front shifter, cable and derailleur. *For more detailed instruction on the installation process see Cycling Utah, May 2015.
The First Test:
Due to time and weather constraints, my testing was limited to about 10 rides; the Shoreline Trail, the hills at Liberty Park, and around the neighborhood. Despite having only a small amount of test rides, I was able to judge immediately how the drivetrain was working.
In my experience with two other 1x conversions at work, the system seemed to work pretty well. Both in the stand and test rides on flat ground the shifting could be rated (on a scale of 1-5) as 3.5-4. The performance of my bicycle, on the other hand, was more like 1.5. Let me say that I can adapt to about anything on a bicycle and the shifting performance of my new 1x drivetrain was totally inadequate. There would no adapting to this. Shifting from the 13 to the 17 was nearly impossible. Once in the 17, moving up the cassette to the 42 was very slow and of below average performance. Holding the shift lever or double clicking up and then shifting one back was required. Getting into the 42 from the 36 was about the only shift that worked well. Even moving down the cassette into the high gears was slow.
Back to the Drawing Board:
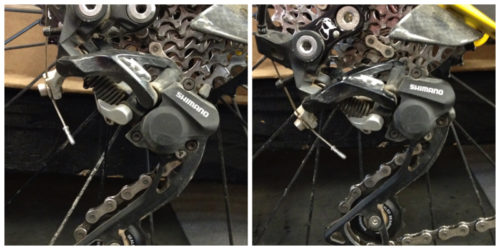
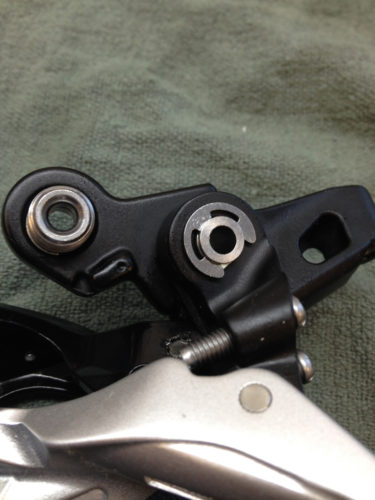
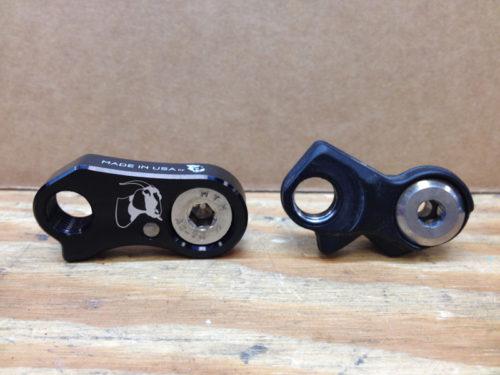
“What is my next step?” I asked myself. During my research I found there is a large array of components available in order to perform the perfect 1x conversion. I an attempt to improve the shifting, I decided to purchase the Wolftooth Components “Goat Link”. This component replaces the standard derailleur tab on a Shimano rear derailleur. The Goat link is a little longer and flatter (see photo 1), which brings the upper rear derailleur pulley closer to the cogs. Notice how much more the rear derailleur is under the cogs on the right of photo 2.
Replacing the link is an easy task. First, remove the rear derailleur. Remove the “c” clip
(photo 3) behind the bolt holding the link to the deraillleur body, and then remove the bolt. Install the Goat Link, replace the bolt and clip. Reinstall the derailleur and make any necessary adjustments to the cable tension. The “b” tension screw will also need to be adjusted, adjust it so the chain shifts smoothly onto the 42 cog without banging into it (you’ll see what I mean).
The Second Test:
It is amazing what a difference one component can make. From the first shift it was apparent that the shifting performance was greatly improved. Moving to the larger cogs was now much smoother, with only a hint of hesitation. I found that it did require a slightly more forceful shifting action, in other words, shift like you mean it. Coming back down to the high gears was nearly perfect.
Unfortunately, shifting from the 13 to the 17 was still next to impossible. During my research I found that Wolftooth Components manufactures a 16 tooth cog and highly recommends removing both the 17 and 15 and installing the 16. After digging around in my parts boxes, I found an old 16 tooth cog. So I replaced the 17 cog with the 16. An enormous improvement. Finally, a setup I could live with.
The Gearing:
Obviously there is a big change in the gearing. The biggest difference is the lack of overlap. A 2 x 10 drivetrain has only 14 gears that do not overlap. The gears I used most and their gear inch size (bold) are shown in table 1.
What this table shows is that in a perfect world, shifting would start, from low to high, in the 22-36, move through the 32, 28, 24, then shift to the 36-36, and move on down one by one to the 36-11. With a single chainring, however, there is no overlap. Shifting would begin in the 30-42 and complete at the 30-11(see table 2).
One of the other differences with my new gearing is a taller low gear and a shorter high gear. Referring back to table 2, the combination 30-42 is a 19 inch gear. This is equivalent to the 22-32, or one gear higher than the lowest of my old gearing. On the high end, at 74 inches, the 30-11 is 14 inches shorter than the 36-11. What does this mean? I need to work harder to get up the steep hills and spin faster to keep up on the downhills.
The Parts:
The first stage of the conversion consisted of the following three parts:
eThirteen EX cog – $69.95
Wolftooth Components Goat Link – $19.95
RaceFace 30t Narrow-Wide chainring – $59.95
The second stage of the conversion required the following:
Wolftooth Components 16t cog – $14.95
Be sure to cross check the compatibility of the new components to the old ones. For example, for use with Shimano cassettes, the add-on cogs are only compatible with XT and XTR. And the Goat link, is not compatible with SRAM derailleurs. So, check compatibility and read the instructions.
Conclusion:
It took a little experimentation, but I have a good working system now. The shifting seems simpler, but I miss the 36-36. That was my go to gear upon cresting a steep up that transitions to downhill. I’m not so concerned about the loss of my high gear, but I do miss the low gear of my old 22-36. Three inches in a gear size does not sound like a lot, but it was enough to have me walking on the steepest hill in my test rides. If necessary, it is possible to obtain a lower gear by purchasing a 26 or 28 tooth chainring for the smaller, 64mm bolt circle of my double crankset.
The total cost of the parts for this conversion is approximately $165. The total time I spent on labor was approximately 3-4 hours. In addition, removing the front shifter parts reduced my bike weight by almost 1 pound. So, for less than half the cost of a SRAM 1 x 11 cassette, anyone can purchase a very adequate 1 x 10 conversion kit.