By Charles Pekow — E-bikes are going to require a lot more safety work. The Consumer Product Safety Commission (CPSC) counted at least 53 fatalities on them between 2017 and 2021, mainly through collisions with motor vehicles and loss of user control. CPSC did its own investigating on 11 cases and found eight involved fire or inadequate brakes.
E-bike battery fires have been responsible for several deaths. Stock photo in public domain.
Also, after at least 140 e-bike battery fires killing at least five people, New York City required landlords to post safety warnings about ebike fires, telling people not to charge if they find smoke, leakage, etc.
By Charles Pekow — Wearing a face mask while cycling might protect you from more than COVID and other contagious diseases. It can keep air pollutants out of your respiratory system, suggests a study from the University of Texas at Austin, but public health officials don’t often mention this.
CC0 1.0 Universal (CC0 1.0) Public Domain Dedication
The research looked at previous studies and concluded “Although the scope of the evidence reviewed was relatively limited, it consistently suggested that mask use may be an effective and inexpensive personal intervention against air pollution for pedestrians and bicyclists. Public health organizations should consider encouraging the continued use of face masks as a personal abatement strategy of air pollution exposure during the post-pandemic stage.”
By Angela Vincent — I love bike touring. Completing many self-supported bike tours over the past decade, it’s the best way to experience any area you’re visiting. Whether it’s huffing and puffing up a mountain; making your way through cities, small towns, and villages; or feeling the breeze on long descents, you gain an appreciation for each mile you pedal. Earlier this year, I was able to check off my bucket list a 2-month, 2,300-mile ride through the northeast part of the US which included a little jaunt through Ontario, Canada. I’ve never been to this area and had always wanted to see it.
Vince (my husband) and I began this trip last year starting from our house in Salt Lake City riding north to Yellowstone National Park. After going through the park, we followed the Adventure Cycling route “Parks, Peaks and Prairies” through Wyoming, South Dakota, and Minnesota. Our goal last year was to make it to the Atlantic Ocean in Maine. We made it to Michigan, riding over 2,100 miles and decided to end our tour because it was tricky crossing the border into Canada at the time and the weather was turning sour as well.
In April of this year, we started where we left off last year in Loomis, Michigan. Beginning early in the year is always a gamble with the weather. The day we were due to start our ride Michigan got over 2 inches of snow. Vince and I are retired so we don’t worry about schedules, reservations, and deadlines. So, with bad weather the first few days of the trip, we made a command decision to drive to Detroit to do the touristy thing. I recommend the Henry Ford Museum as a fantastic way to spend a day.
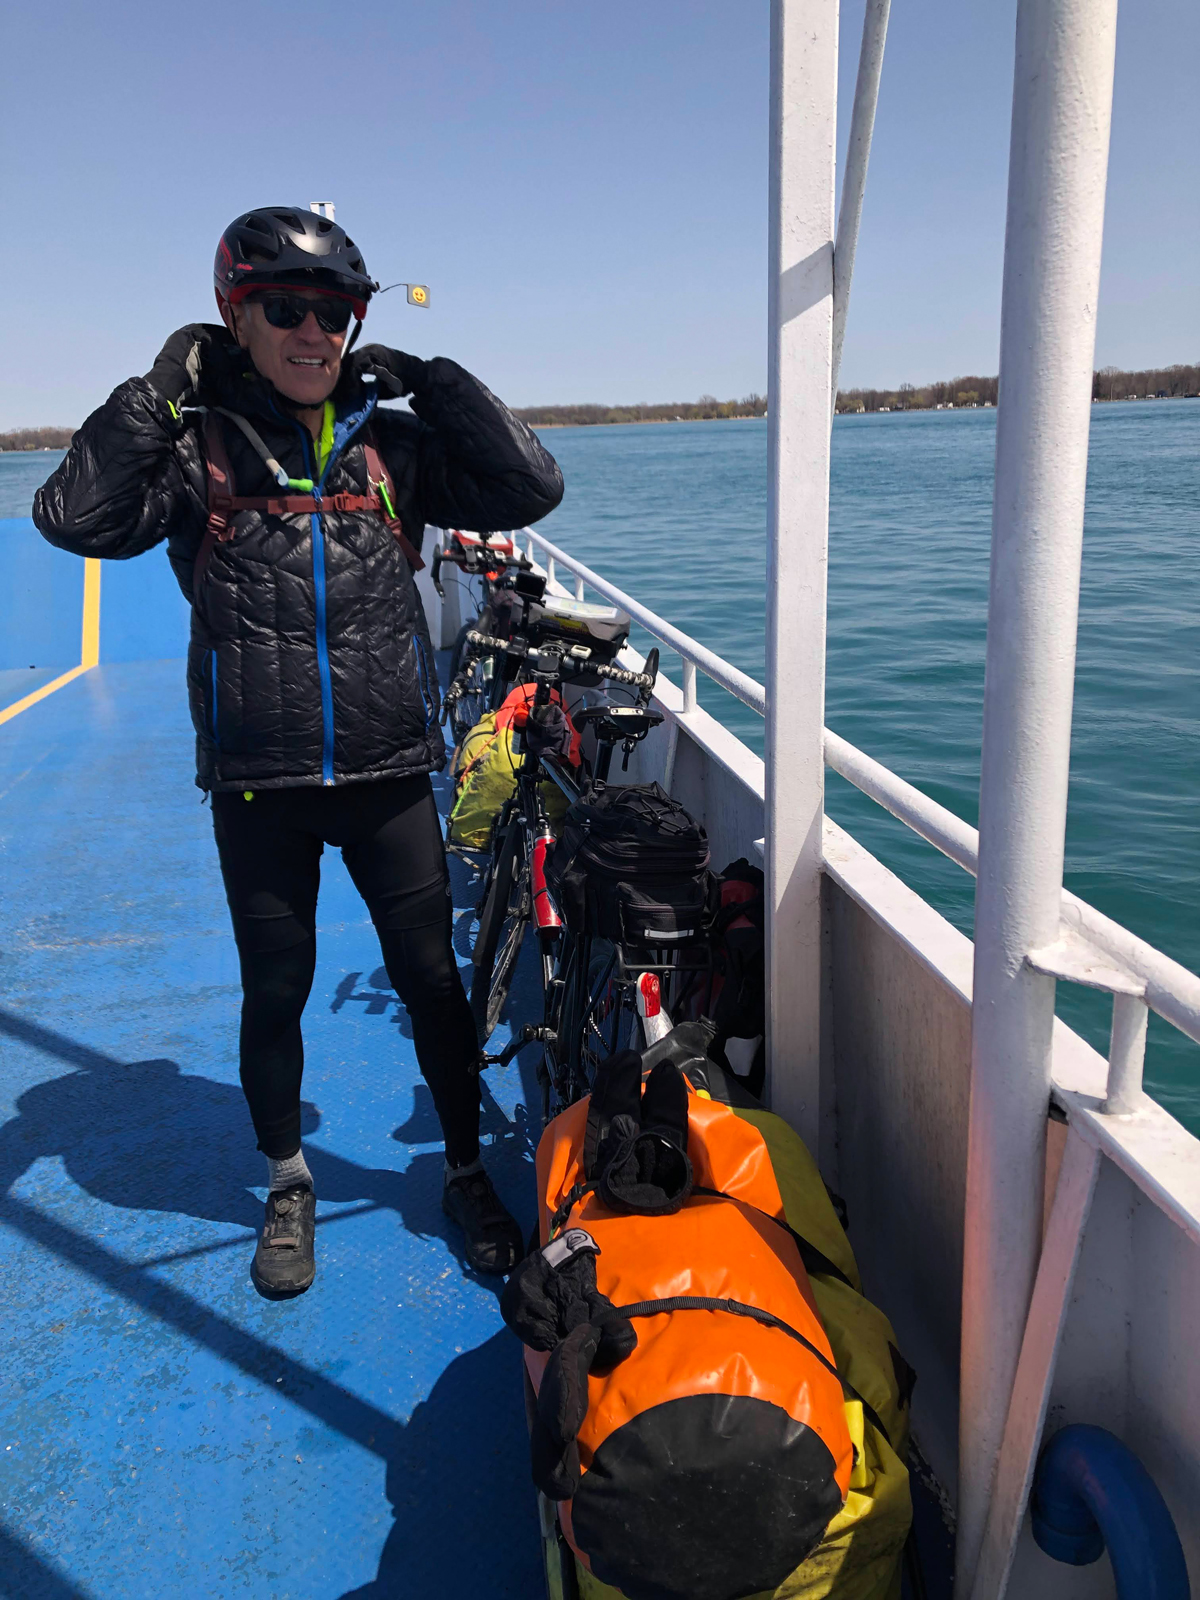
Don on the ferry from Michigan to Ontario. Photo by Angie Vincent
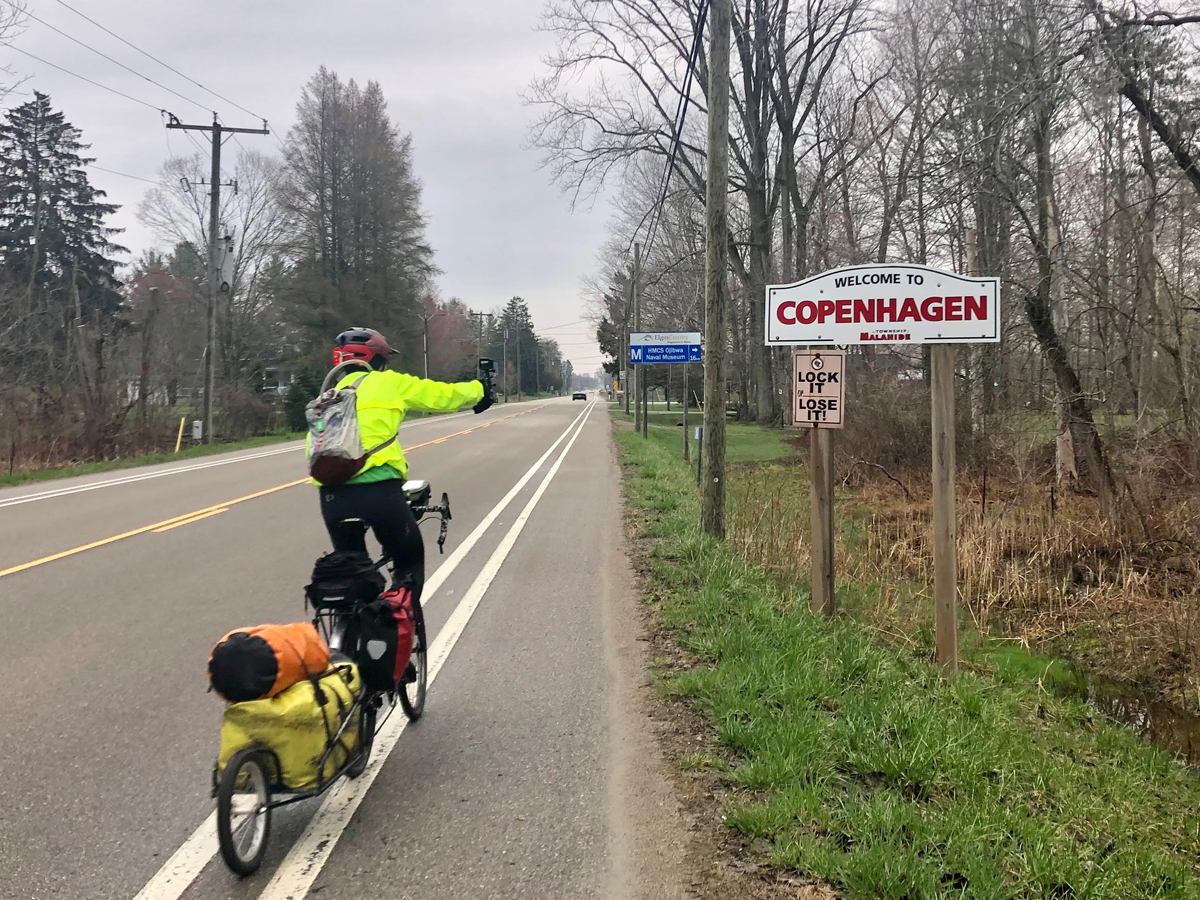
Waiting those few days was an excellent choice because we had the perfect first day of riding; blue skies, cool but not cold temperatures and no wind. Yippee! We weren’t always so fortunate the rest of the trip. The plan this year was to make it to the coast of Maine and loop back to Michigan. Our route took us through Michigan where we caught a ferry to Ontario, Canada. Riding along the north side of Lake Erie in Canada, we went through many small coastal tourist villages. Another advantage of starting early was that we avoided large crowds that usually hit after the start of summer season. A distinguishing characteristic of Canadians is their congeniality and I noticed that even their dogs are friendlier as not one tried to attack me on my bike. I carry an air horn (works like a charm) to scare any aggressive canine but never had to use it. We finished our trek through Canada, crossing the border north of Niagara Falls. The locals say the best view of the falls is on the Canadian side, but they may be biased. Anyway, it was breathtaking.
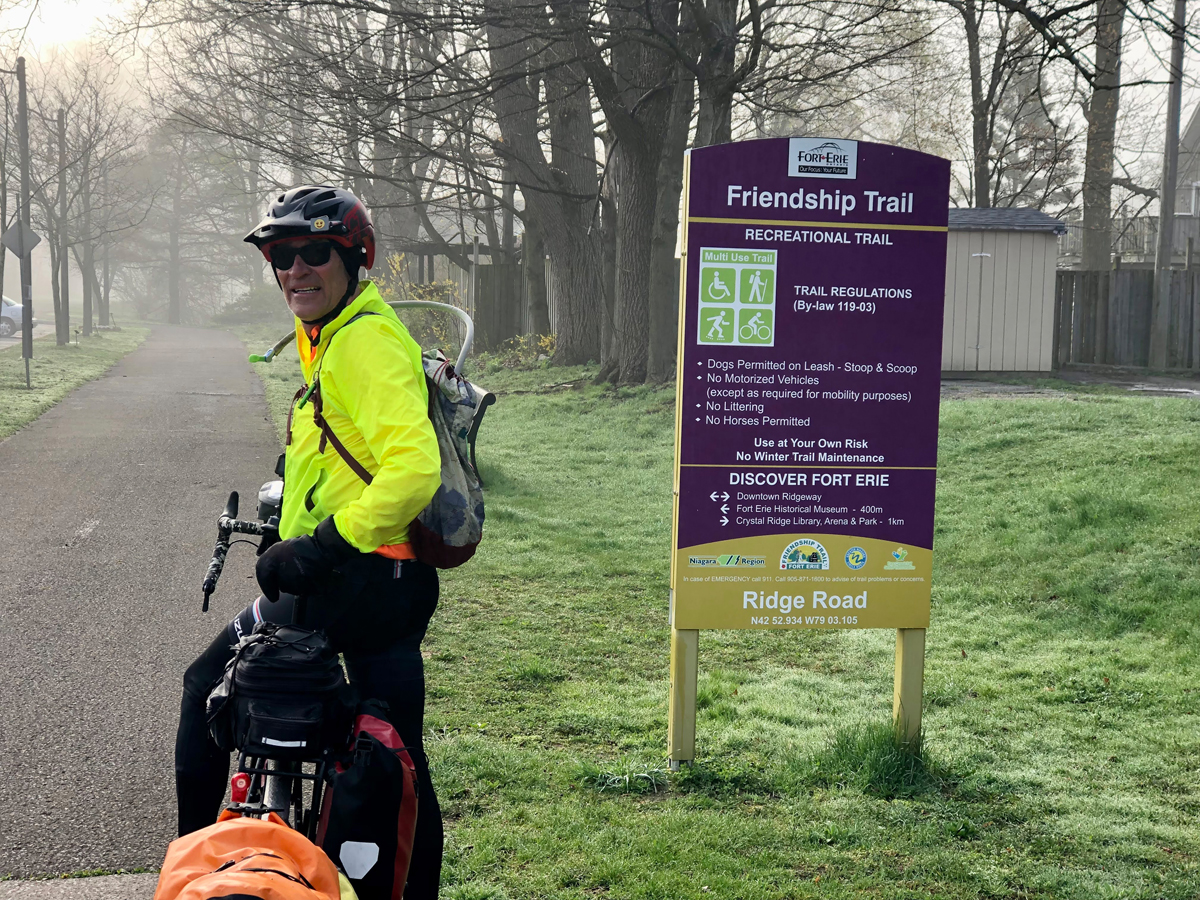
Don on a Bike path near Fort Erie in Ontario, Canada. Photo by Angie VincentDon entering Copenhagen in Ontario. Photo by Angie VincentDon and Angie at Niagara Falls (on the Canadian side). Photo courtesy Angie Vincent
Reentering the US, we biked across upstate New York through the Adirondacks to Ticonderoga on the east side. New York is an awesome place to tour. Most of the roads had really good shoulders with beautiful scenery along the way. Unfortunately, we hit bug season in the Adirondacks. Pedaling up a steep incline at 3 mph with a gazillion bugs all over your face and body is true testament to balance keeping your bike upright while swatting at those pesky devils. After trying everything else, DEET works best. I don’t know what the long-term effects will be but keeping the bugs at bay makes the day much more enjoyable.
In line for customs reentering the US. Photo by Don Vincent
Vince and I have had our share of mechanical failures on bike trips. We’ve broken spokes, derailleurs, cables, shifters, and had countless flat tires. This trip was no exception. I was riding behind Vince when the wheel on his Bob trailer came off and rolled across the road, through a ditch, under a fence and landed in tall grass. Vince felt it come off but never saw where it went. If I hadn’t been riding behind him, it would have taken him forever to find his wheel. I went after the wheel and got zapped. Who knew the fence was electric? It would have been better if Vince hadn’t laughed so hard…for the rest of the day.
From Ticonderoga on the east side of New York, we were supposed to take a ferry to cross Lake Champlain and land in Vermont. As with all trips, flexibility is the key. The ferry was closed so we rode 25 miles to a bridge that led to another 25-mile detour due to a road closure. Of all the places we biked on this trip, Vermont had the worst roads. Because they were narrow with lots of pot holes, we were forced to dodge pot holes and cars while the cars dodged pot holes and bikes. You get what you get but on the plus side, the scenery was lovely. We pulled into Haverville, a small village, one rainy day expecting a restaurant because Google said so. But as luck would have it…closed that day. Pulling out our phones, we tried looking for a place to stay and eat. No signal, ugh! Fortunately, a local happened by and gave us the WiFi password for the coffee shop next door which was also closed that day. With thunder clouds looming overhead, trail angels were watching over us as we sat outside the shop hoping the rain would hold off a little longer. We found a B and B right across the street from the closed restaurant. Our hosts for the evening gave us the lowdown of the area and talked a great deal about Bernie Sanders who shows up at their annual festival in the fall. What a treat.
Crossing over the Green Mountains landed us in New Hampshire. The roads in New Hampshire were better by far. Climbing up to Kancamagus Pass at 2,855 feet in the White Mountains was the highest elevation of the trip. We also passed over the Appalachian Trail and stayed in the town of North Woodstock. We met and saw numerous hikers from the trail during the overnight stay. Our neighbors at the hotel that night were from Germany. Dressed only in towels, they were drying all their gear out in the parking lot.
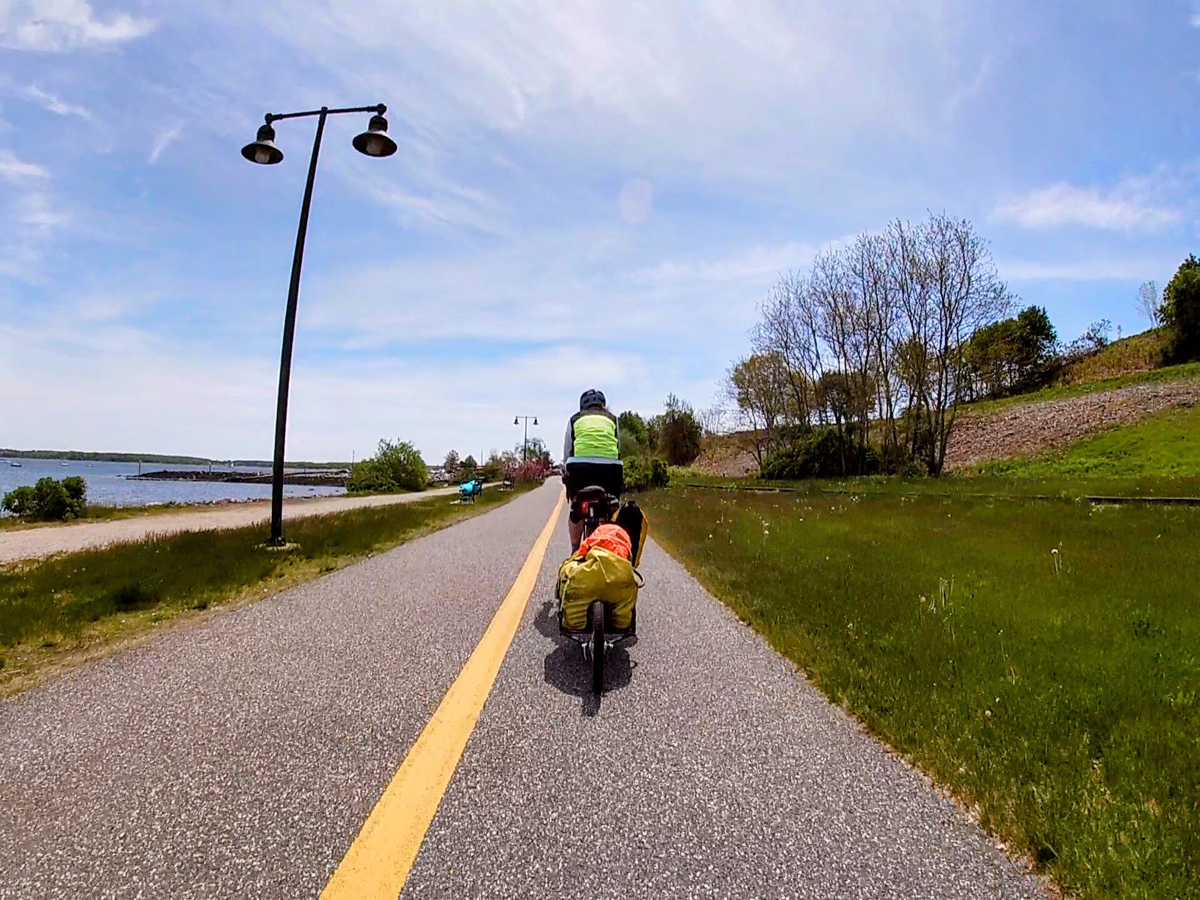
Angie Vincent on a bike path along the Altantic coast in Maine. Photo by Don Vincent
On any long tour, road conditions change frequently. Getting closer to the Atlantic Ocean, we started hitting more populous towns. More people means more traffic. Brunswick, Maine was the most petrifying day for me. We began the day early and hit morning rush hour traffic on a curvy road with absolutely no shoulder. It felt like each passing vehicle came within inches of my elbow and I’m sure they were doing at least a 100mph. After a couple of hours of unending, terror filled riding, we stopped for second breakfast. I would have preferred a strong alcoholic drink at this point, but eggs and bacon were a good substitute. Happily, the roads got better after breakfast.
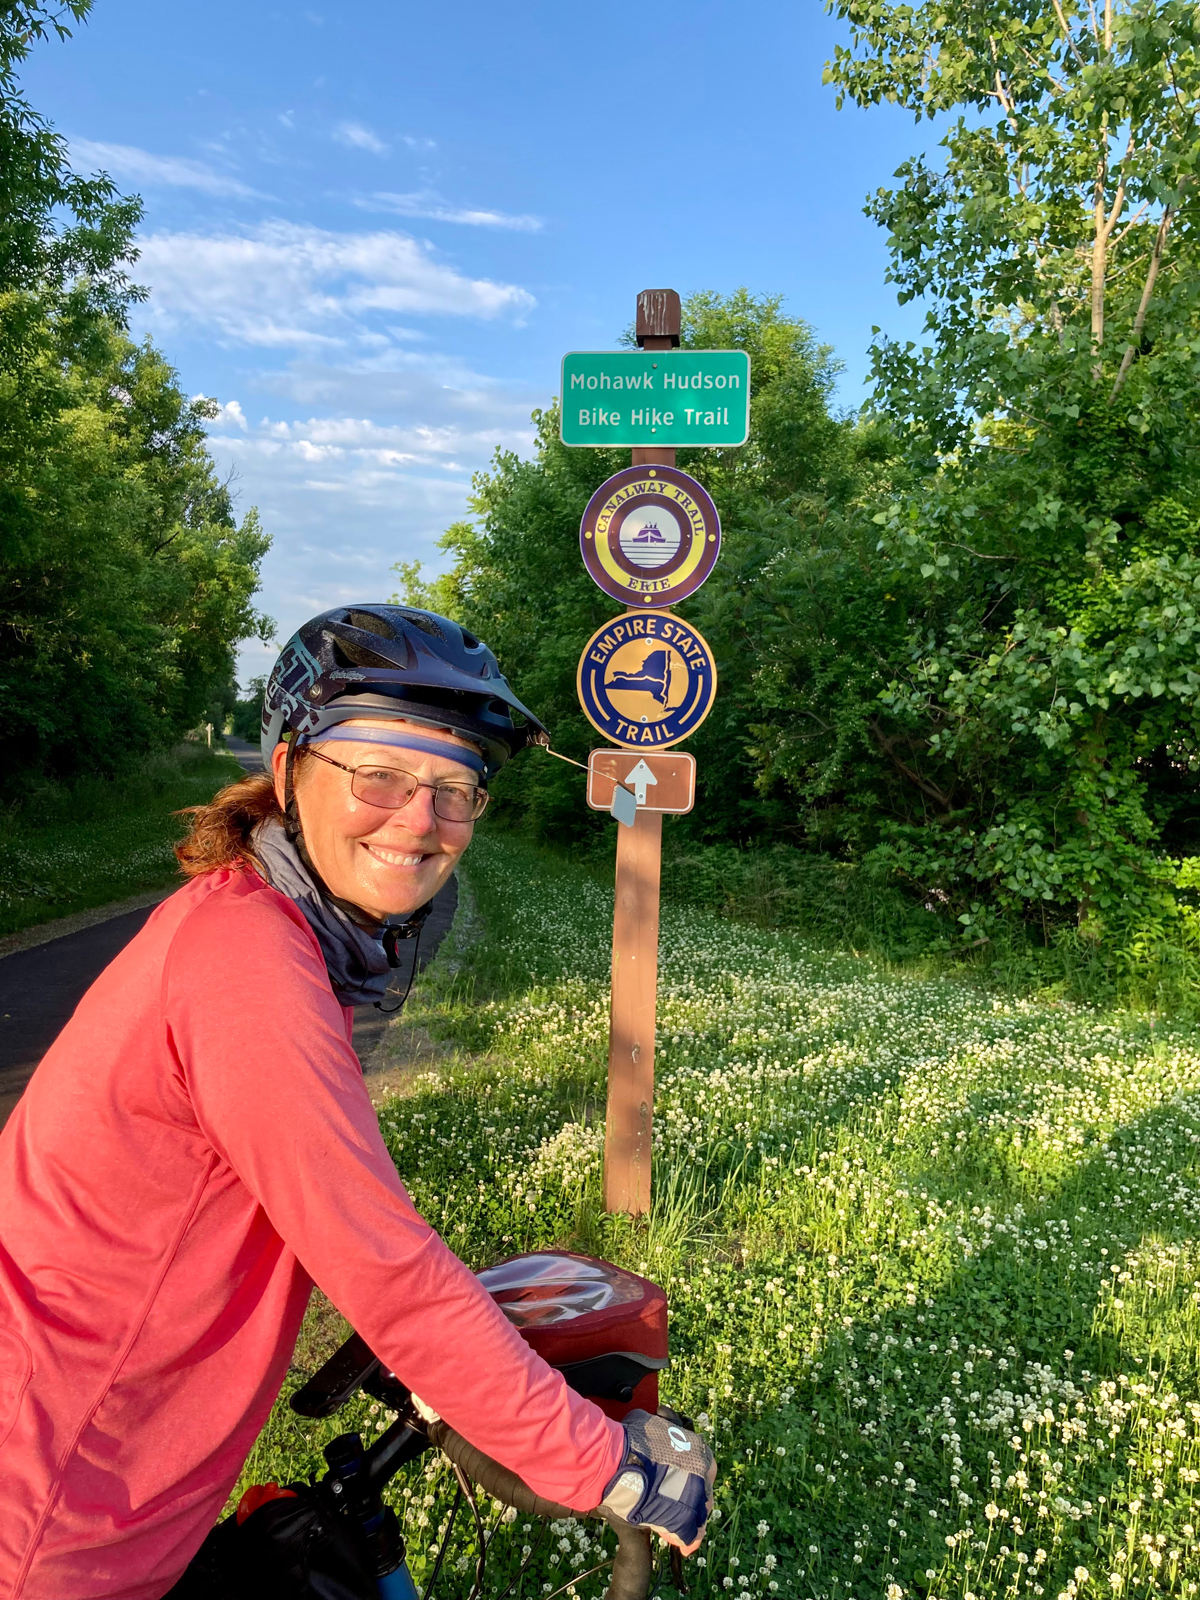
Angie Vincent on the Erie Canalway Trail. Photo by Don Vincent
The next part of our journey took us along the Atlantic Ocean hitting several coastal towns which included Portland, Bath, Kennebunkport, and Portsmouth. After a few days of riding along the coast, we skirted around Boston and headed inland through Massachusetts.
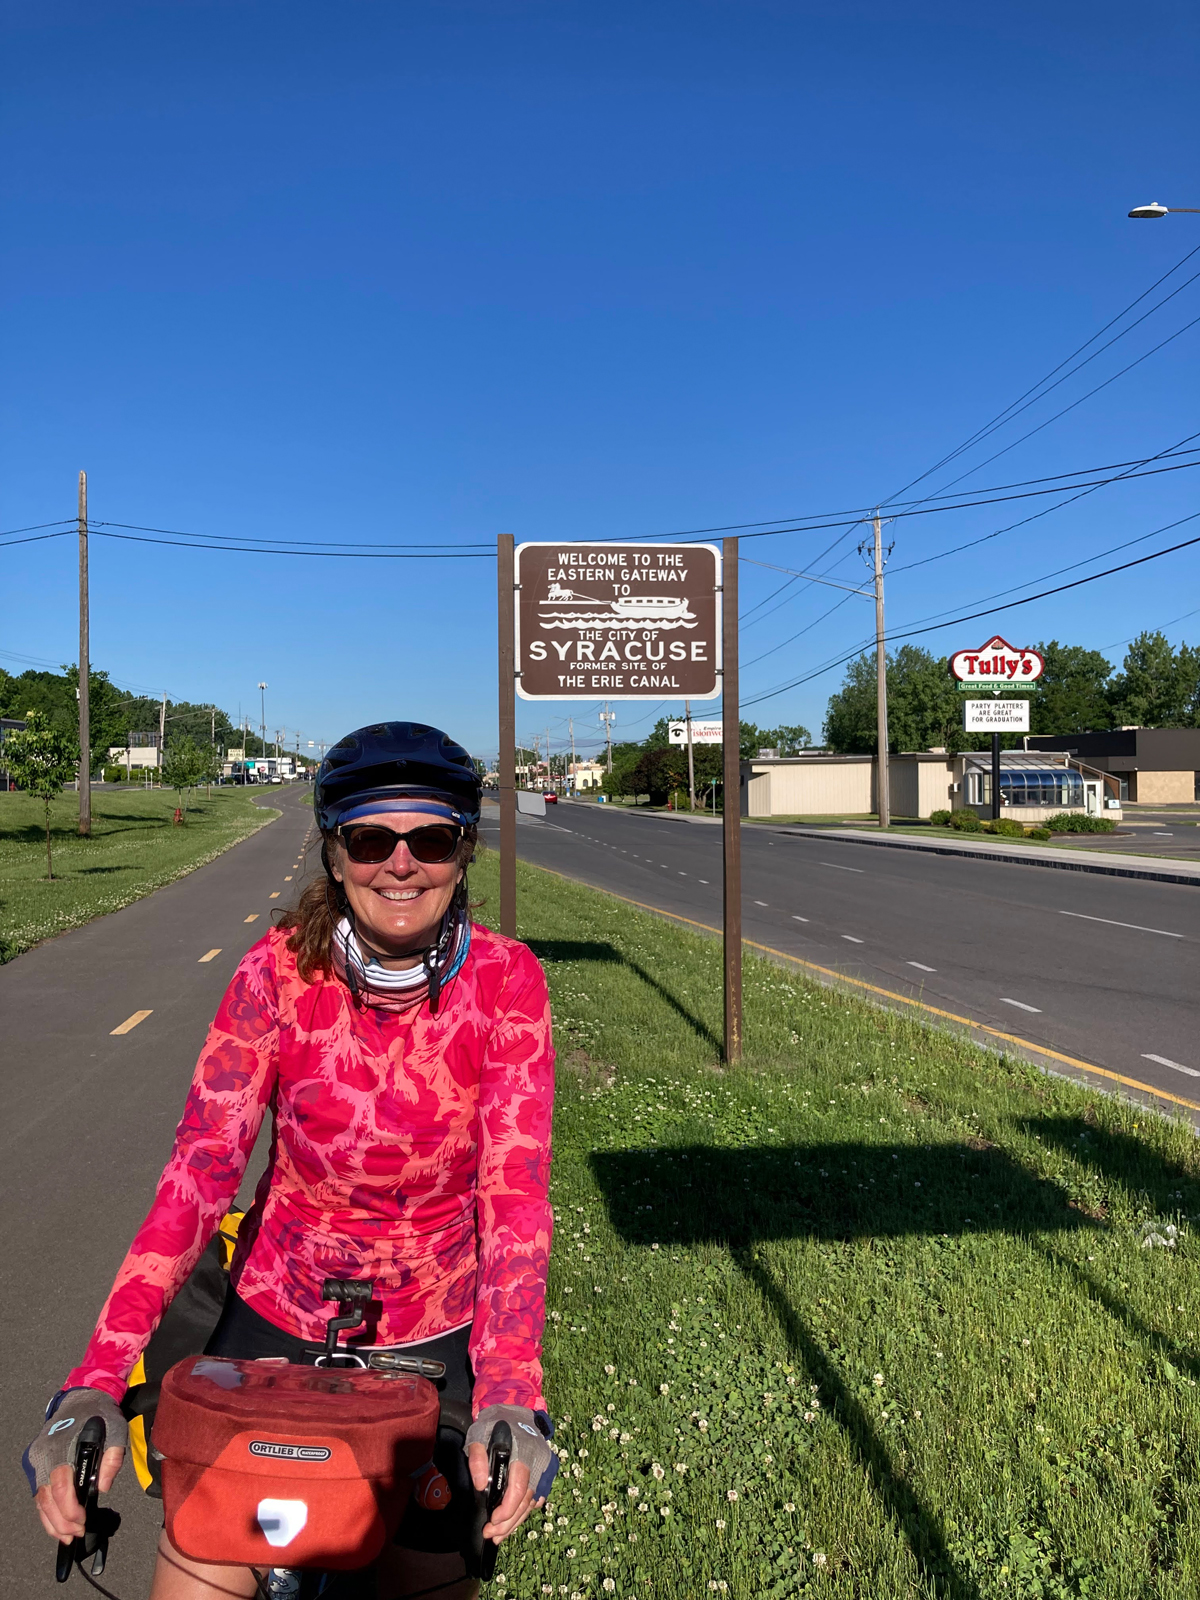
Originally, our plan was to bike through Pennsylvania to return to Michigan. But we were so close to Albany, New York that we decided to head there instead. In Albany, we picked up the Empire State Trail/Erie Canal. The Erie Canalway is a cycling destination for riders of all abilities and follows one of the world’s most famous man-made waterways. We rode 400 miles from Albany to Buffalo with 90% on dedicated bike paths. In Syracuse, the bike path runs straight down the middle island between a six-lane highway, with traffic lights for bikers. It’s a bike tourer’s dream.
Angie riding through Syracuse, New York. Photo by Don Vincent
We stayed in Buffalo for a couple of nights to escape a huge rain storm. On the third day, we woke up early to beat the traffic. Riding through downtown Buffalo just as the sun was coming up over the horizon was a real luxury. There were absolutely no vehicles. We were following Google Maps at the time, and everything was going fine until Google tried to put us on the expressway. You know you’re in trouble when the on ramp has a NO BIKES ALLOWED sign. We tried to recalculate but Google refused to cooperate. Fortunately, a Buffalo police officer escorted us, with flashing lights, off the on ramp, and gave us directions to where we needed to go. Whew.
Leaving Buffalo, we headed toward Cleveland, Ohio following a marked route that is part of the USBRS (US Bike Route System) along the southern side of Lake Erie. Our last day of biking ended in downtown Cleveland, Ohio where we ate lunch with the church crowd at a local restaurant. We enjoyed a great meal in our sweaty bike clothes surrounded by everyone else in their Sunday finest. It was a great ending to this trip. The following day we rented a one-way SUV and drove back to our car in Michigan.
Every bike tour is the same, but also different. The memories I will take from this trip are dodging rain storms, the abundance of bike paths, and humidity. On our eastbound trek, geese were just hatching their new born chicks. And as we returned westbound, those chicks became “teens”. It was fun seeing their growth. The mommas could be aggressive if you got a little too close. One significant difference in touring on the east coast is that towns tend to be closer together so there are more options for overnight stays. Vince and I did stay in more hotels on this trip. It sure was pleasant not to have to rough it every night. We’ll soon begin planning next year’s ride. Not sure where it will take us, but I’m sure it will be just as fun.
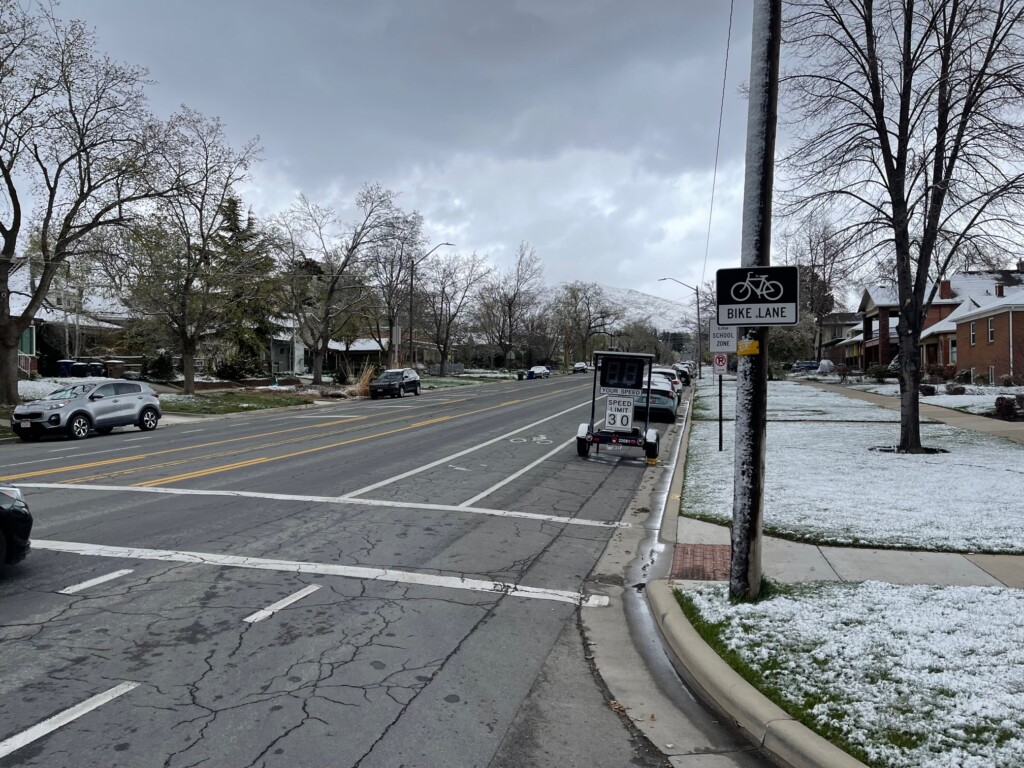
Under Utah HB395, 2023, cyclists could be required to use a bike lane, even if it’s substandard, filled with debris, or if it’s safer to use the travel lane. Photo by Dave Iltis
Under the proposal, cyclists could no longer take the travel lane and would be forced to ride in a poorly maintained bike path or bike lane. They could no longer avoid obstacles or debris if it was in the bike lane as they would be required to use it. This could cause faster paced cyclists to ride on pathways that aren’t designed for higher speeds. It would prevent cyclists from avoiding door zones, which some bike lanes have. During winter, if a path was not maintained, cyclists would be forced to use the pathway despite this. And, it removes the choice or option of cyclists to determine how to best navigate the roadways. That choice for a cyclist best determine how and where to ride safely is preserved in this portion of code 41-6a-1105: “A person operating a bicycle or a moped on a roadway at less than the normal speed of traffic at the time and place and under the conditions then existing shall ride as near as practicable to the right-hand edge of the roadway except when:…”
The bill is currently has been sent to the House Transporation Committee.
The key part of the bill text reads as follows:
41-6a-1105.Operation of bicycle or moped on and use of roadway — Duties,prohibitions. (1) An individual operating a bicycle or moped on a roadway shall operate the bicycleor moped within the path or part of the roadway set aside for the exclusive use of a bicycle ormopedexists on the roadway.
This is a change from the current code which reads:
(4) If a usable path for bicycles has been provided adjacent to a roadway, a bicycle rider may be directed by a traffic-control device to use the path and not the roadway.
Legally, there is a clear distinction between ‘may’ and ‘shall’ and the proposed code change would force cyclists into unsafe situations and would also undermine cyclists right to use the roadway as a lawful vehicle. The bill is a big step backwards.
Email members of the House Transportation Committee and ask them to vote against HB395. When it does come up for a vote in committee, you can speak against the bill. Track the bill’s progress here. The bill has not yet been given a hearing date.
Email your House representative (find them here) and ask them to ask Rep. Kohler to pull the bill and to vote against it if it does come up.
By Eric Ramirez — You might think that the most representative connection you have to your bike is the saddle and handlebars. But, without forward motion that connection makes the bike more like your favorite arm-chair. No, the key connection to your bicycle is the pedals; as you drive them forward the gears and chain give you the momentum that makes you go. The stress of this motion results in wear on the drivetrain. As such, a large percentage of bikes that come to me for repair are in need of work on the drivetrain – I replace a lot of cassettes, chainrings, and chains.
Gears and Chain:
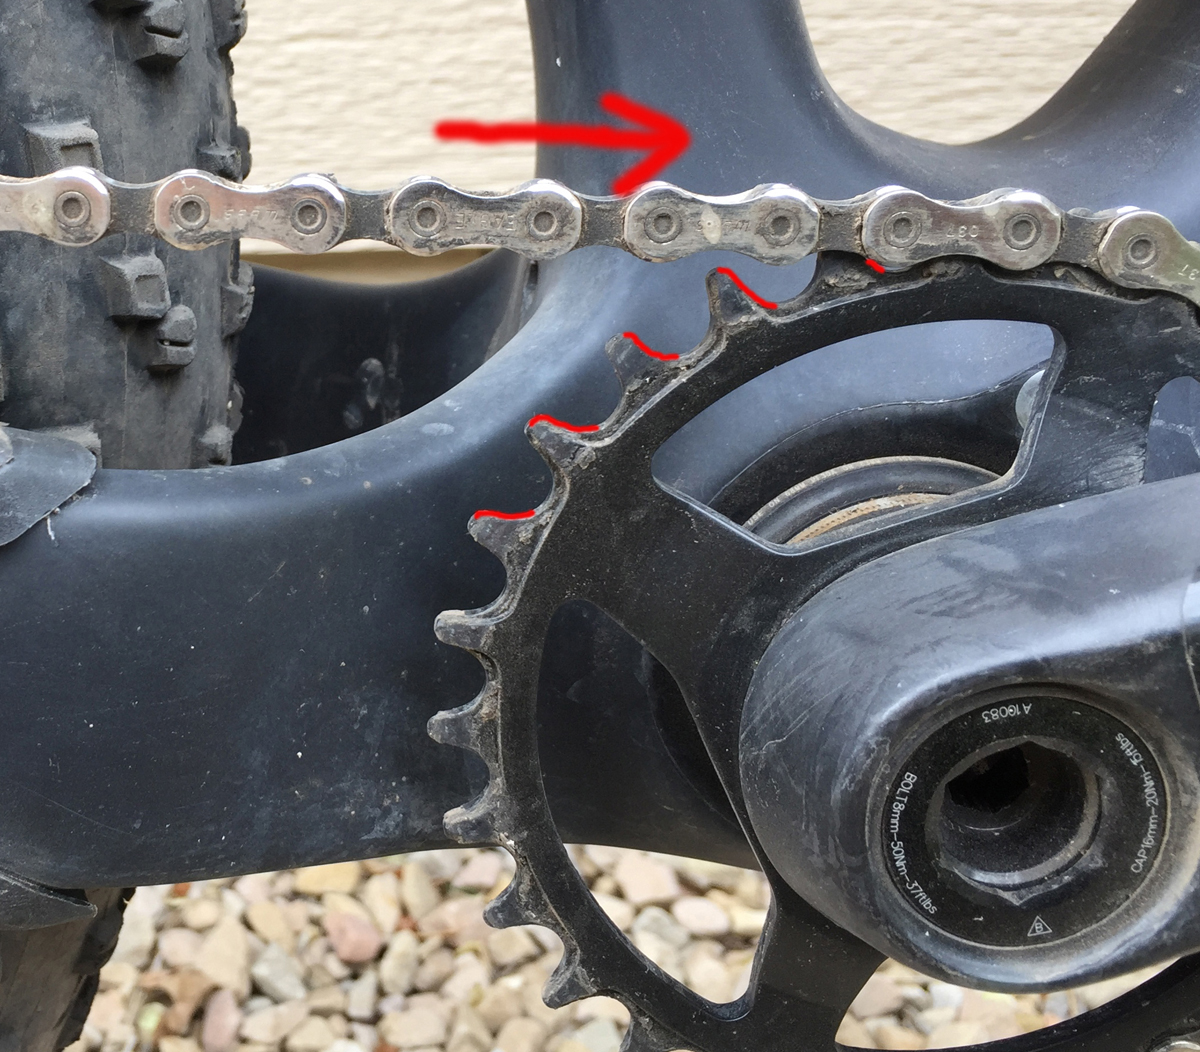
Imagine watching the pedaling motion from the drive-side of the bike, or the side with all the gears and chain. The motion of your foot driving you forward moves the crankarms in a clockwise, circular direction. In fact, you are driving a metal circular gear called a chainring. Zoom in and imagine the teeth of that chainring pulling the chain into orbit around the gear and hence pulling the bike forward. The leading edges of those teeth are taking the brunt of the force that you exert.
As long as the chain is within reasonable wear limits, it will not prematurely wear out the teeth of the chainring. However, over time wear is inevitable. The sheer pressure of the teeth pulling that chain forward slowly mashes those metal teeth and they deform in one way or another. As the chain starts to wear and effectively “stretch”, the wear on chainring teeth is exacerbated. Chainring design attempts to compensate for this with the use of stronger alloys or coatings, cold forging or stamping, but eventually all succumb to the erosive force of use.
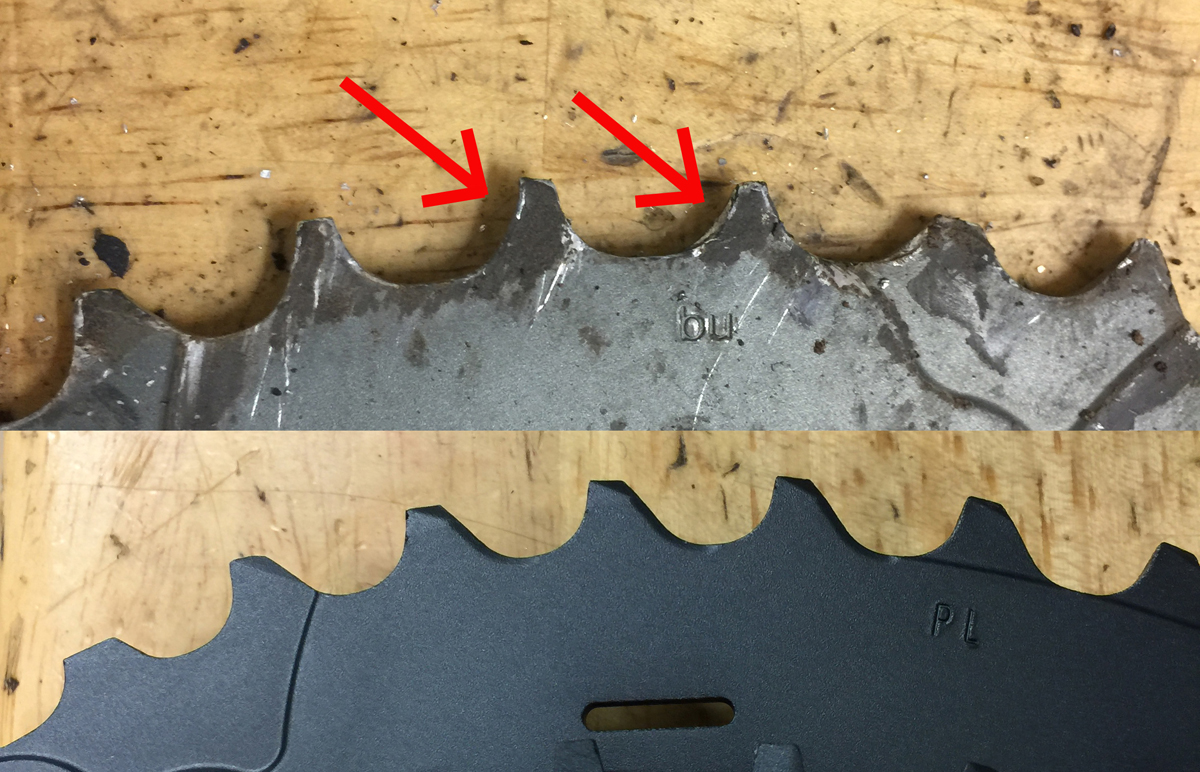
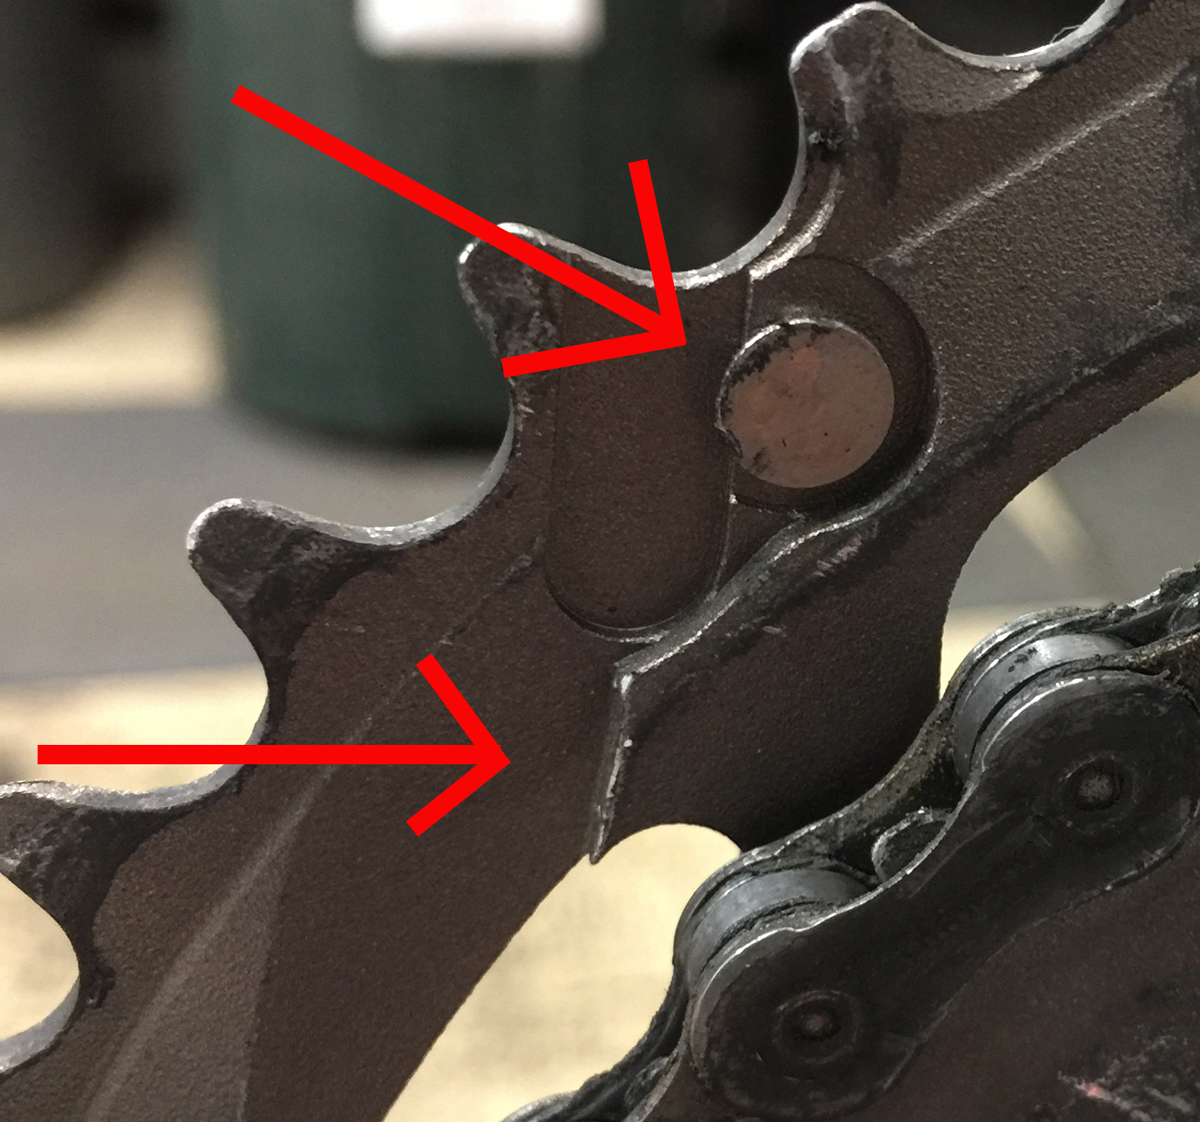
Used cassette teeth show mashed metal; an unusual lip can be felt moving across the the tooth. Photo by Eric Ramirez
The same thing happens to your cassette – the gear cluster mounted to your rear wheel – only faster. The teeth of these gears will see the mashing effect on the opposite side; this is very apparent on an older, worn cassette.
Often, within just a few rides, an overly-worn chain may break. Chain wear is without a doubt the quickest type of wear on a bicycle. New drivetrain systems with 11 and 12 cog cassettes, or speeds, have a greater width across and thus require greater lateral chain movement.
The chain has minimal stress in gear combinations that allow it to travel in a straight line. But, this is often not the case. In the easiest and the hardest gears (respectively the largest and smallest cogs), a chainlink departs on its journey from the cassette traveling above the chain-stay to the chainring under the load of the bike and rider. Looking down from the saddle, the chain is laterally twisted as it leaves the cog and arrives at the chainring. Here, the chain is under the most stress since this is not a natural, straight-line motion.
When mechanics talk about “chain stretch” they’re referring to the wear caused, chiefly, by this motion. The plates of the chain chew at the pins and vice-versa. As this wear progresses, it will continue to degrade the drivetrain gearing at an accelerated rate. Something will give; usually it will be the chain.
The Fix: (A Shop Scenario)
The chain is broken. We examine the break and it is clearly from wear. We replace the chain, or at least plan to. On a test ride it is discovered that the chain will not shift cleanly from cog to cog and under load the chain literally skips forward on the gear (under pressure the chain will jump a space ahead). Then, the chain gets sucked up on the chainring going for another revolution. This action can nearly break off the rear derailleur as the chain tension ramps up.
Red marks the part of the tooth that sees the most force and wear during use. Photo by Eric Ramirez
At this point it is clear that chainrings and cassette need replacing. The cost of this adds up quickly, especially on higher-end road bikes. Replacing these parts will generally fix the issue. However, a fancy chainring will last a very long time offering easy maintenance and shift quality if the chain is regularly replaced.
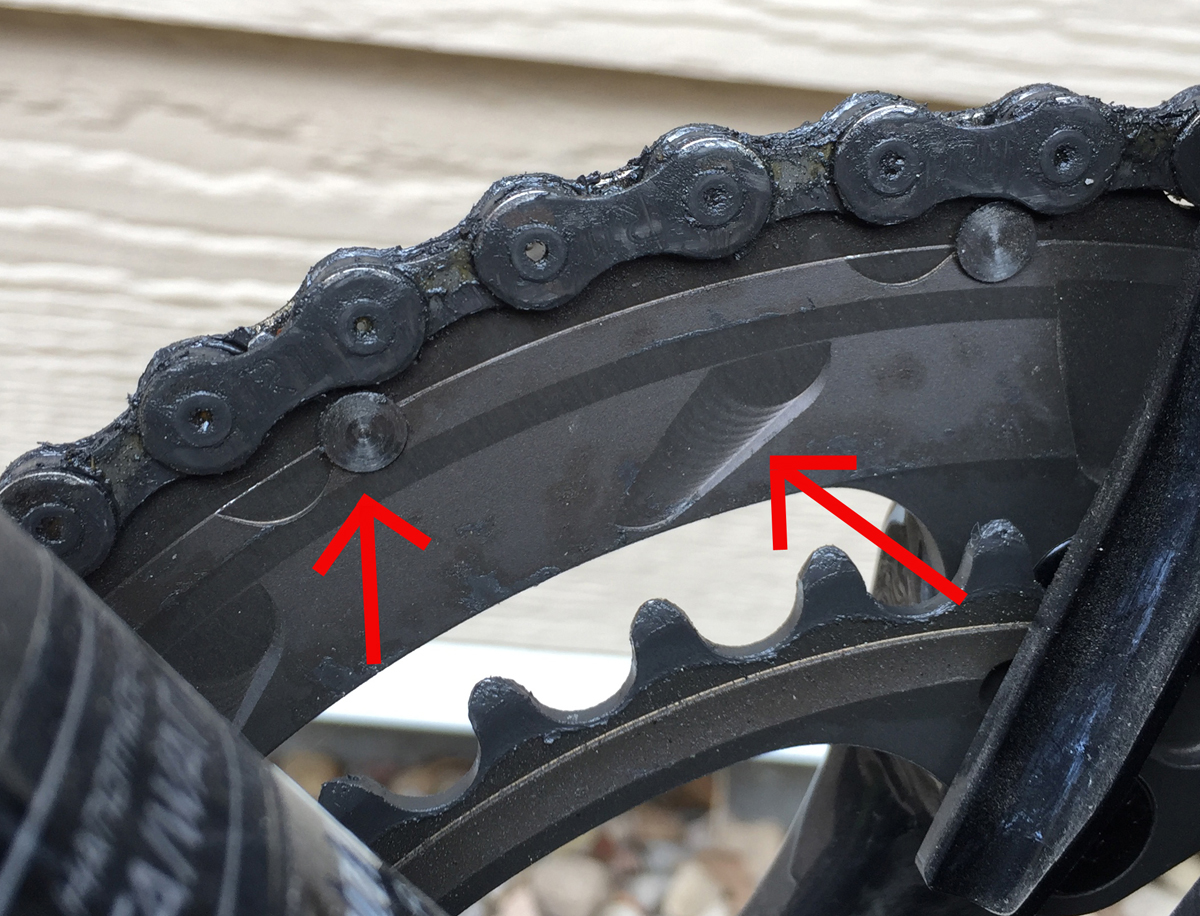
Identifying the shifting workhorses of chainrings (ramps are also found on cassettes). Photo by Eric RamirezRamps and pins shown here have signs of rounding and thus lose the ability to shift cleanly. Photo by Eric Ramirez
It is worth mentioning that other types of stress can cause a chainring or cassette to need replacing prematurely. Part of the shifting process consists of the chain hopping on to ramps and pins on chainrings and cogs to physically shift up the range. If a derailleur isn’t properly adjusted or shifting is very hard or aggressive, these ramps and pins wear down and shifting becomes extremely difficult. Gear replacement is the only fix.
You and your mechanic will be able to find the most reasonable fix. Sometimes, replacement options will be limited depending on availability of replacement parts. Generally, there are more options than ever and you’ll usually be able to find something that will work well and save you some cash. The best option usually matches the hardware you already have. That, however, is not always the most economical.
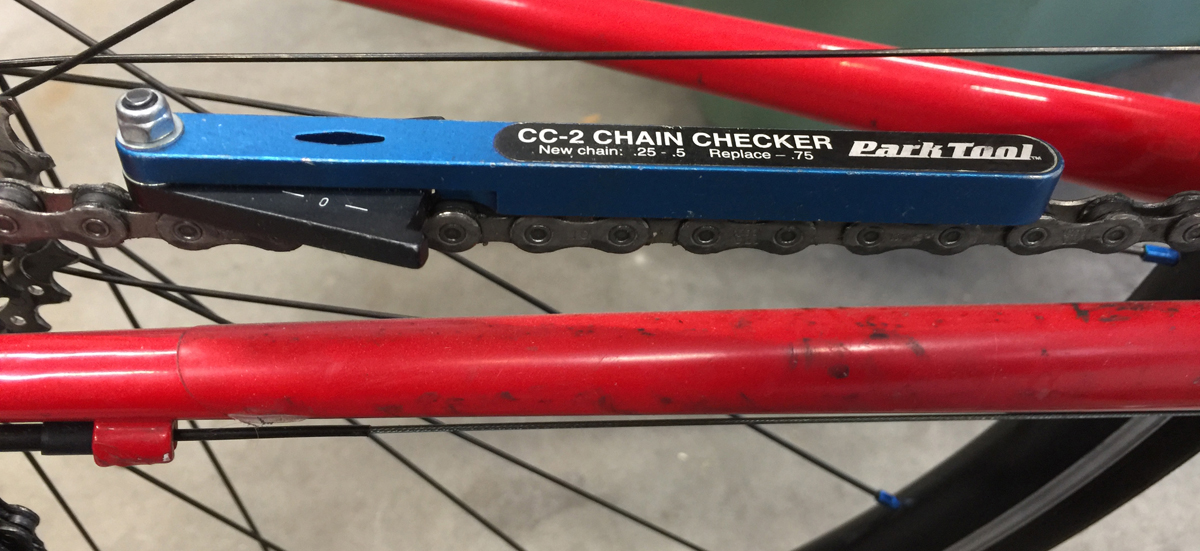
Checking chain ‘stretch’. Photo by Eric Ramirez
Mileage:
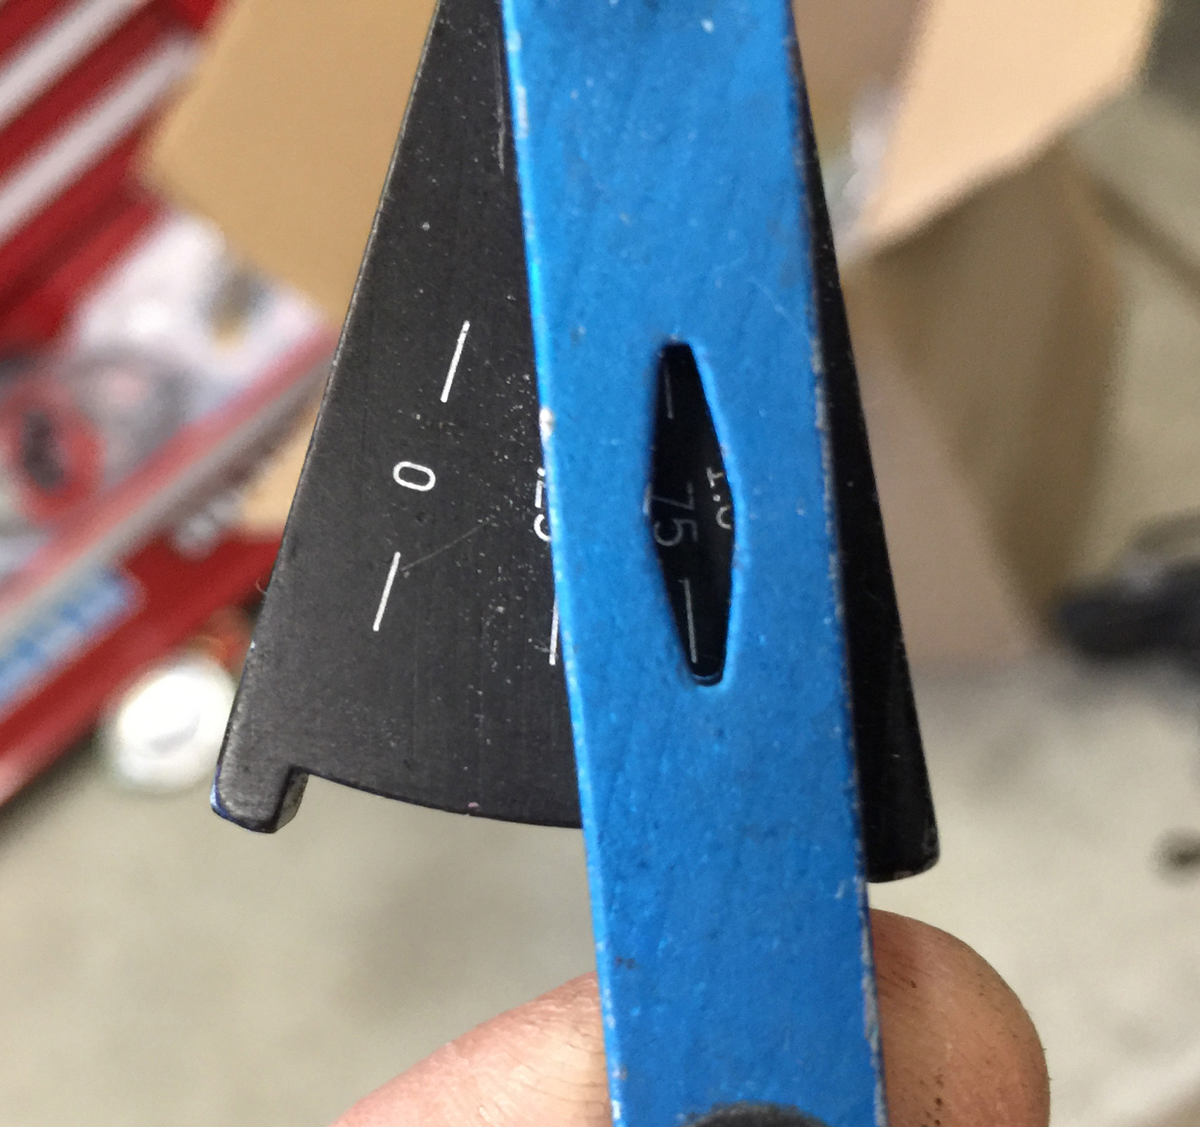
Folks often ask me how many miles they can expect to get out of a chain. My response is, unfortunately, ambiguous. There is no clear answer for this since every rider varies in weight, riding style (sprinting, climbing, long, flat-out, mellow, racing, etc.), terrain preference, and equipment choice. But checking the wear on the chain with a simple chain length gauge will help to know when the time has arrived to replace it. The information in this article will help you to know if other things need replacing too.
Usually when this tool displays 0.75 chain replacement is recommended. Photo by Eric Ramirez
By Kira Maicke — ‘Tis the season to get excited about commuting! With temperatures rising, and National Winter Bike to Work Day coming up, here are a few tips for planning a safe, fun commute.
Prep Your Gear
Aside from your typical repair items, (tubes, tire levers, multi tool, CO2 / frame pump, patches) you will want to ensure your lights are charged. I like having a bright red blinking tail light, and a higher lumen front light. When it comes to road riding, 500-750 lumens is a good starting point if you will be relying on the light to brightly illuminate your path. You’ll appreciate that bright path to assist you in navigating around those rim bending pot holes! For those who commute to and from school and work throughout the winter, often times in the dark, a bright front light is even more important. Since you typically have to leave earlier on a bike than in a car, I like to set out my clothes and shoes the night before, to simplify my morning routine. The easier it is to get going in the morning, the more likely you will stick with commuting. (The previous advice may not be as relevant for morning people, but if you’re anything like me, the easier it is to roll out of bed and onto my bike, the better!) Springtime offers additional clothing challenges due to the drastic changes in temperature. Layer in the morning with a light jacket that is easy to pack up for your warmer ride home. In terms of clothing, visibility is key. Many clothing companies offer photo reflective jackets and accessories to make riders more visible to cars in darker lighting. There are also many options available for reflective velcro straps to wrap around ankles and arms, and tape to add to helmets.
Kira Maicke’s commuter bike gets her to work and around town. Photo courtesy Kira Maicke
Know Your Route
When you need to get to where you’re going by a certain time (work, school, etc ), it is important to plan out a safe and predictable route. Before I commuted for the first time on a work day, I took a trial ride on Saturday to familiarize myself with the route I had planned to take. If you tend to be directionally challenged like me, another great option is to mount your phone on the handlebars of your bike and use GPS. Google Maps has a bike setting that typically plans its bike routes using bike paths and low traffic roads. I maintained my initial route religiously for a few weeks, then began exploring alternative paths on my way home, to learn more about the city and find the quietest, safest roads. Even the most carefully planned predictable route can be derailed by a flat tire, train crossing, or unusually heavy traffic, so I leave an extra 15 minutes early just in case.
Follow The Rules
As cyclists, we are required to follow the rules of the road. This means making full stops at stop signs and red lights, yielding to pedestrians, and signaling. While this is not only necessary and courteous to other vehicles, behaving in a predictable and respectful way will also help keep you safe. Riders should signal to alert changes in direction, and these changes should be carried out in a confident and predictable manner. When changing lanes, be sure to allow plenty of space to move gradually, versus drastically cutting across multiple lanes of traffic. It is illegal, and often more dangerous, to ride on the sidewalk. Cars are not looking for bikes on sidewalks, and many collisions occur when a car turns right, while the rider continues straight. By following the rules of the road, we not only gain the respect of drivers and pedestrians, we are also staying as safe as possible.
Enjoy
The Ride!
Once you get into the groove, commuting can be addicting! Especially in the warmer months, I challenge myself to see how little I can use my car. Make a goal to take your bike on trips under five miles, turn a commute home from work into a group ride to get dinner, or just get some bonus training miles in! One of the best parts about commuting is how easy it is to change up the ride, adding small adventures to the start and finish of your day.
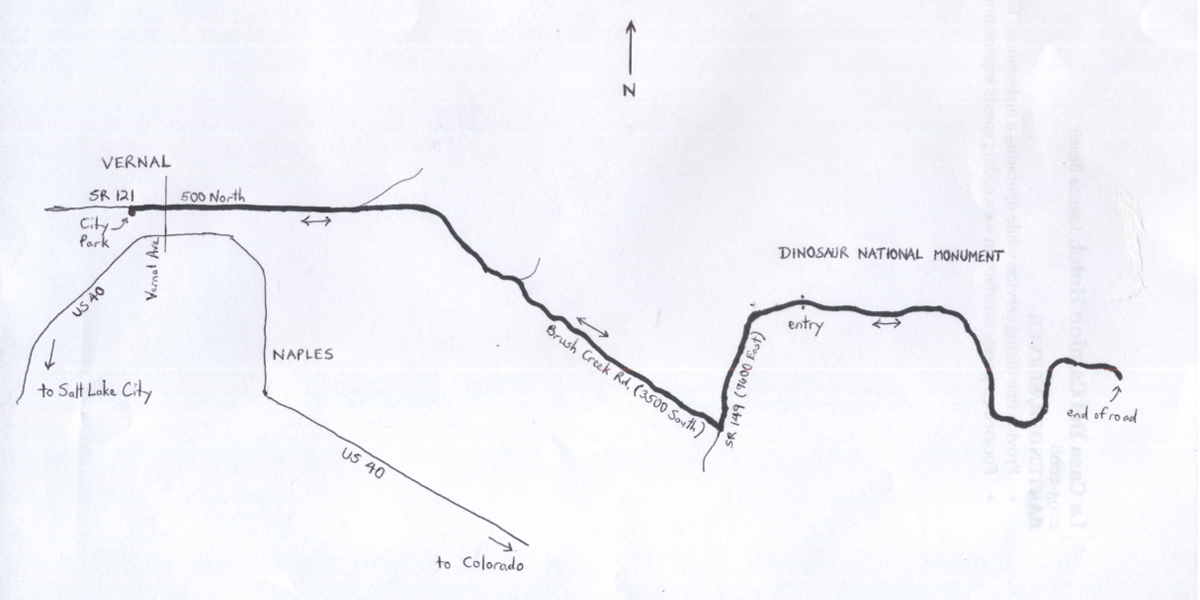
By Wayne Cottrell — The Dinosaur Country Cruise is a 48.1-mile, out-and-back ride over gently rolling hills and false flats. The ride journeys from Vernal, into the Dinosaur National Monument as far as the pavement stretches, and then returns. The pavement surface is good along the outer ends of the route (i.e., in Vernal, and approaching and in Dinosaur National Monument) but is fair to rough along Brush Creek Road, in the middle section of the course. There are ten cattle guard crossings. The elevation ranges from 5,359 feet in Vernal to 4,757 feet along State Highway (SR) 149 near Dinosaur National Monument.
The main feature of the ride is Dinosaur National Monument, which was the site, in 1909, of the discovery of a rich cache of dinosaur fossils. Among the fossils found were those of the allosaurus, apatosaurus, barosaurus, brontosaurus, camarasaurus, camptosaurus, ceratosaurus, diplodocus, dryosaurus, stegosaurus, and torvosaurus—an impressive quarry. The discovery forever changed Utah’s role in paleontological history, and led to the creation of the Dinosaur National Monument, along with other dinosaur-related attractions in Utah (such as the Dinosaur Diamond Prehistoric Byway). The monument began as a quarry; today, a visitor center allows the general public to view the ongoing process of fossil evaluation, as well as an authentic dig. Later, the site was expanded to include opportunities for river rafting, hiking, scenic drives, and geological exploration in the Yampa and Green River Canyons. Although the monument headquarters is located in Dinosaur, Colorado, the Utah side features the Quarry Visitor Center and the Green River.
The ride begins in Vernal, Dinosaurland’s largest city and center of commercial activity (population 9,089 in 2010). Several facts distinguish Vernal: One of the few Utah towns founded by non-Mormons, and the largest city in the United States with no railroad are two of the city’s claims to fame. Monuments to Tyrannosaurus rex and a creature that resembles Barney stand at two of the city’s gateways. The city has a hard, rural, industrial feel, perhaps because of the city’s outlaw past, and the work involved in water reclamation and oil-extraction projects. But the city has a “soft” side, with plenty of outfitters providing for the region’s recreational opportunities, museums, and a few outstanding examples of architecture.
Start the ride at Vernal City Park; head east on 500 North from 900 West. Where 500 North curves to the right to become 500 West, turn left to continue on 500 North (mile 0.3). Cross Vernal Avenue and continue heading east. The roadsides become increasingly rural through here: open space, pasture, and fewer houses. At the fork in the road (mile 3.9), veer right onto Brush Creek Road. The pavement surface gets rough here; watch out for potholes. The vista is of a desolate, dry landscape. The road turns downhill at mile 7.3; stay right at the Y intersection at mile 7.8. Climb out of this “saddle” to mile 8.5, and then begin another steep downhill. Reach the foot of the descent at mile 9.0; enter Brush Creek Valley. There are a few houses through here and a prominent bluff on your left. The pavement surface improves at mile 9.7, except for a rough, narrow bridge at mile 11.7. Turn left at mile 12.5 onto 9600 East (SR 149) and head north. This lightly used state highway (680 vehicles per day in 2005) provides direct access to Dinosaur National Monument. After passing some lovely meadows, with bluffs on your left and the Green River on your right, enter the monument at mile 14.3.
The monument’s entrance station is at mile 16.0; you may be required to pay a fee here, although the station was unmanned when I visited. The visitor center (not the quarry, which is up the adjacent hill) is on the left; stop here for restrooms, refreshments, and information. The mountains in the foreground appear to “bubble” over the landscape; the tall peak in the background is Split Mountain (elevation 7,609 feet). The road through the monument reveals a mixture of tilted sedimentary rocks, hogbacks (steep ridges that are narrow at the top and broad at the bottom), flatirons (successions of hogbacks), and cuestas (asymmetrical ridges). There are also sections of desert scrub, along with panoramas of the Green River and nearby Yampa Plateau. Cross the Green River at mile 21.5, and begin a gradual climb. The rocky ridges have a very bright sand color that accentuates their ruggedness. The grade eases at mile 23.2, and the road narrows at mile 23.9. Turn around here; beyond this point, the road continues to narrow, becoming unpaved. On the return ride, cross the Green River at mile 26.1 and begin to climb. The road crests at mile 27.8; check out the expansive vista at mile 29.2. You are looking at the broad draw of the Green River. The famous Dominguez-Escalante expedition passed through this area in 1776. The visitor center appears on the right at 31.7; exit the monument at mile 33.8. After crossing Brush Creek, turn right onto 3500 South (Brush Creek Road; mile 35.5) and start the westerly journey back toward Vernal.
Cross the rough, narrow bridge at mile 36.1; the pavement surface becomes consistently rough at mile 38.4. The road climbs at mile 39.1. After cresting at mile 40.0, the road makes a sharp descent; stay left at the Y intersection, and watch for gravel in the turn. The road makes a short, steep climb before entering rolling terrain. This area, through which you passed earlier, is particularly desolate, with only patchy scrub. The high mountains in the far distance are the Uintas, Utah’s tallest range. The pavement surface improves at mile 42.4. Vernal can be seen in the distance at the crest in the road at mile 43.4. Turn left onto 500 North (no street sign) at mile 44.2. Development slowly returns after you cross Ashley Creek at mile 45.5. Cross Vernal Avenue at mile 47.2. At mile 47.7, turn right at 500 West to continue on 500 North. The ride ends at 900 West (mile 48.1); turn left here to return to Vernal City Park, which is on your right after making the turn.
For more rides, see Road Biking Utah (Falcon Guides), written by avid cyclist Wayne Cottrell. Road Biking Utah features descriptions of 40 road bike rides in Utah. The ride lengths range from 14 to 106 miles, and the book’s coverage is statewide: from Wendover to Vernal, and from Bear Lake to St. George to Bluff. Each ride description features information about the suggested start-finish location, length, mileposts, terrain, traffic conditions and, most importantly, sights. The text is rich in detail about each route, including history, folklore, flora, fauna and, of course, scenery.
SALT LAKE CITY, Utah (February 6, 2023 ) — As part of a push for more participation in bicycling, Salt Lake City will host its quarterly Mayor’s Bike to Work on February 8, 2023 at 7:30 am at Liberty Park.
Salt Lake City Mayor Mendenhall (left) leads the Mayor’s Bike to Work Day in the fall of 2022 on the Jordan River Parkway. Photo by Dave Iltis
Event details:
Wednesday, February 8th, 7:30 AM
The event will start at Liberty Park at 7:30 AM and will end at the City and County Building. The ride will begin at approximately 8:15 AM.
Coffee and breakfast refreshments will be on hand to fuel the ride.
The route will take approximately 10 minutes to complete.
By Tara McKee — In Europe, women lead the city biking movement and in many cities such as Copenhagen and Amsterdam, they clearly outnumber male riders. Fashion blogs such as Copenhagen Cycle Chic show how women in Denmark’s largest city dress for their commute, wearing dresses, suits, skirts, high heels and boots. Here in the states, big cities such as New York City have gone bicycle crazy, blending an eco-conscious style with the eco-conscious living. It’s chic to be seen riding a bike, so one might spot even models and movie stars riding their bikes around NYC or Beverly Hills.
The better the cycling infrastructure is in a community, the more likely women are to ride. Rocky Mountain states have made huge strides in the past few years, adding more miles of bicycle lanes and paths and widening road shoulders. More women are feeling more confident and ready to take the challenge of riding to work in Idaho’s Ada County or Wood River Valley as well as in Utah’s bike-friendly communities such as Salt Lake City and Provo. When communities strive to make the streets safer to ride on, they’ll find more cyclists taking to the streets dressed to impress, and not to duel with cars.
Want to take advantage of the greener and cheaper alternative to driving? During these fair weather days, it’s a great time to challenge yourself to give your gas-guzzling car a rest and make that commute to work by bicycle. Commuting needn’t be an ordeal, but you’ll want to assess the type of commute you have to make and choose the bicycle, clothing and accessories to make the ride an enjoyable one. If you’re headed to college, use your bicycle instead of a car to keep of the notorious “Freshmen 15” and save money at the same time. Whether your destination is work or school, you’ll want to learn the best places to keep your bicycle safe and secure. If you are comfortable locking it in the nearest bike rack, use a good quality u-lock. Many cities offer bicycle lockers for rent, as do some employers. Taking the bicycle right into your office may also be an alternative.
For tips on how to make a quick Wonder-Woman transformation from a biker into a credible executive, Cycling Utah will have a follow-up article on how to achieve a post-ride polish in next month’s issue.
Panniers can be used to carry work supplies and extra clothing. Photo: Beth Runkle.
City Style Commute
The Route: Relatively short (4 miles or less) trip that is mostly flat and has good bike lanes or low-speed traffic route the majority of the trip. Often, this is a completely urban route for women who can ride from their downtown loft or apartment to work or shopping within the downtown area.
The Bicycle: An upright, comfortable “city” bike with a step-through (women’s style) frame, fenders, chain guard, maybe even skirt guard. Dutch-style bicycles, which may be a bit heavy for a longer commute, are perfect for such a trip! Vintage bicycles with a step-through frame are also fun to ride. (Steel frames make for a softer ride.)
Extra accessories: Have your bicycle equipped with a bell, a be-seen light to make you visible on a gray, foggy day or in low-light conditions. A basket fitting on either the front or rear of the bicycle is an absolute necessity for many women. Buy a nice basket that appeals to your sense of style and is large enough to carry a purse, perhaps a small shopping bag and a few other items. If your bicycle has a rear rack, you may want to add some panniers to carry even more items. Thankfully, panniers have come a long way from just basic black and many sport beautiful prints and colors.
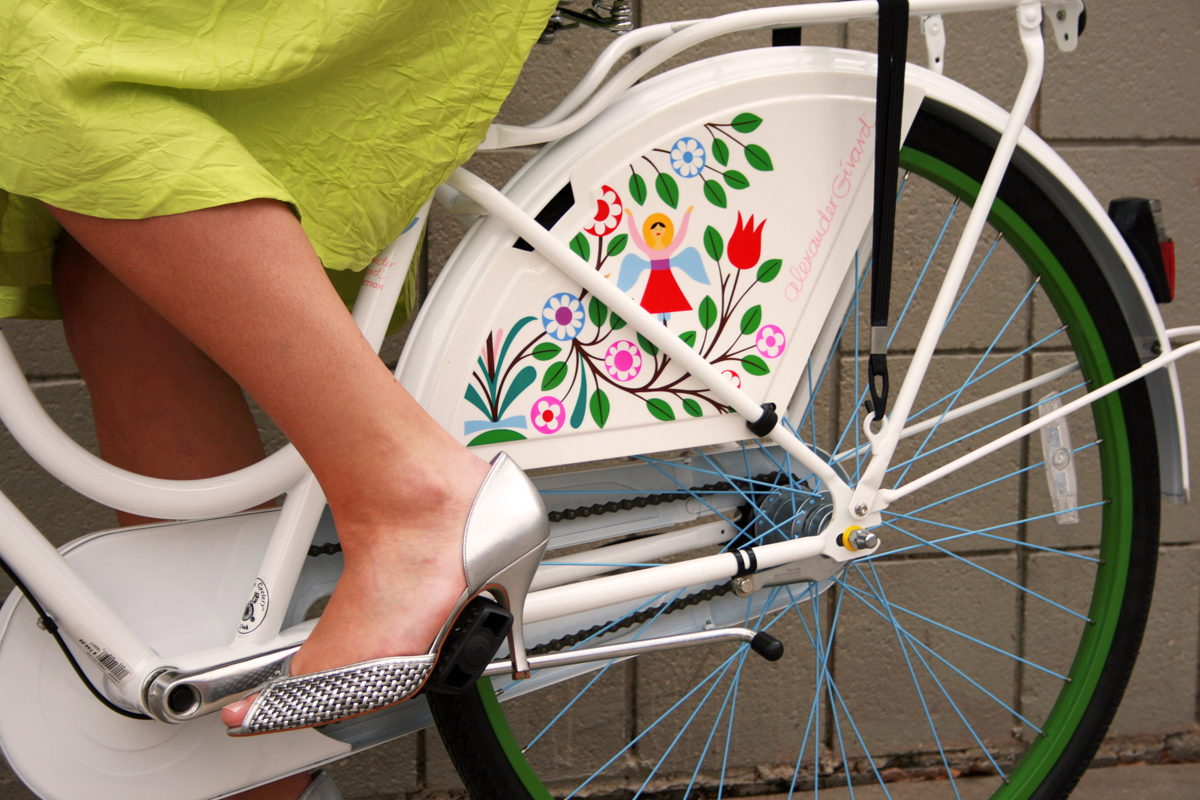
Clothing: The beauty of the step-through bicycles with chain guards and fenders is that a girl can wear a pretty dress and heels or fashionable boots and wide-leg pants without worrying about damaging them. Wedge heels are a little problematic for pedaling but some women find that a spike heel nicely fits around the pedal.
Special Tip: Give yourself time to enjoy a leisurely ride. Ride at a slow pace so you don’t break a sweat. The best route by bicycle won’t be the typical car route. You may be able to ride through parks, along a bicycle pedestrian path and straight onto that pathway at the end of the cul-de-sac. Get a local bikeways map or use the Google map bike app to plan out your route.
This bike has a chain and wheel guards to keep grease and water away from clothing. Riding in heels is possible for shorter commutes. Photo: Jessie Keller
Suburban Commute
The Route: A mid-length trip (about 4-10 miles) that may involve a little hilly terrain. Remember, the best route by bike isn’t always the same for a car, you may wish to go a little farther out of your way to avoid high-speed traffic areas or significant hills.
The Bicycle: The categories of bicycles that are called “commuter” bicycles are perfect for this. But any upright, comfortable, somewhat lightweight bicycle will work. Women can find bikes in this category with a step-through frame so wearing a skirt, dress or longer coat is not a problem. To protect your clothing from the occasional spatter from the road add fenders. Many “commuter-style” bikes have a chain guard so you don’t have to worry about the chain catching on your pant leg or staining them with grease.
Extra Accessories for the bike: To carry what you need, add a rack with panniers (those baskets or bags that fit on the rear rack of your bike) and/or a front basket will nicely hold your purse, lunch, and other items you’ll want to pack. If your load is easily carried in a messenger bag, you could alternatively take that instead.
Clothing: On some days or some commutes, one can dress as she would for work. Alternatively, a loose-fitting comfortable top can be worn then changed for a nicer one once at your destination. Wear comfortable street shoes and casual skirt or pants.
To Pack: You may just want to change from tee shirt into a blouse once there, bring or have at work small make-up bag and hair accessories for touch-up. Bring heels to change into if desired. If you are carrying a laptop on your commute, you should probably carry it in a messenger bag rather than panniers to protect it from occasional jarring as you hit a few bumps in the road.
Long Distance Commute
The Route: –A longer route of well over 8 miles that may have some hills.
The Bicycle: –A lighter weight bicycle to get up the hills and cover the miles is preferable, such as a hybrid, a commuter-style bicycle or even a road bike.
Extra Accessories for the Bike: –Have a rack installed so you can carry some panniers, a basket if you like, and front and back lights for the low-light of early morning and evening commuting. If you have to keep your bike on a rack, get a good U-lock to keep it safe.
Clothing for the Commute: Wear what you are comfortable in for the distance. A mix of casual clothing and technical clothing might be a nice and practical choice. Technical tops work well to wick away moisture. Merino wool jerseys will do the same on cool autumn days. Remember, once you remove the clothing that you biked in, you are removing 90% of the sweat. Bike shoes aren’t necessary unless you prefer them.
To Pack or keep in your desk at work: A complete change of clothing including shoes, facial and/or baby wipes to wipe off sweat, a small make-up bag, a brush, comb and curling iron or flat iron as desired. A little spritz from a spray bottle of a combination of leave-in conditioner mixed with water can be used to alleviate the compliant of “helmet hair.” Dry shampoo also does wonders. If you are packing your clothes in the panniers, roll them instead of fold them to reduce the chance of them getting wrinkled.
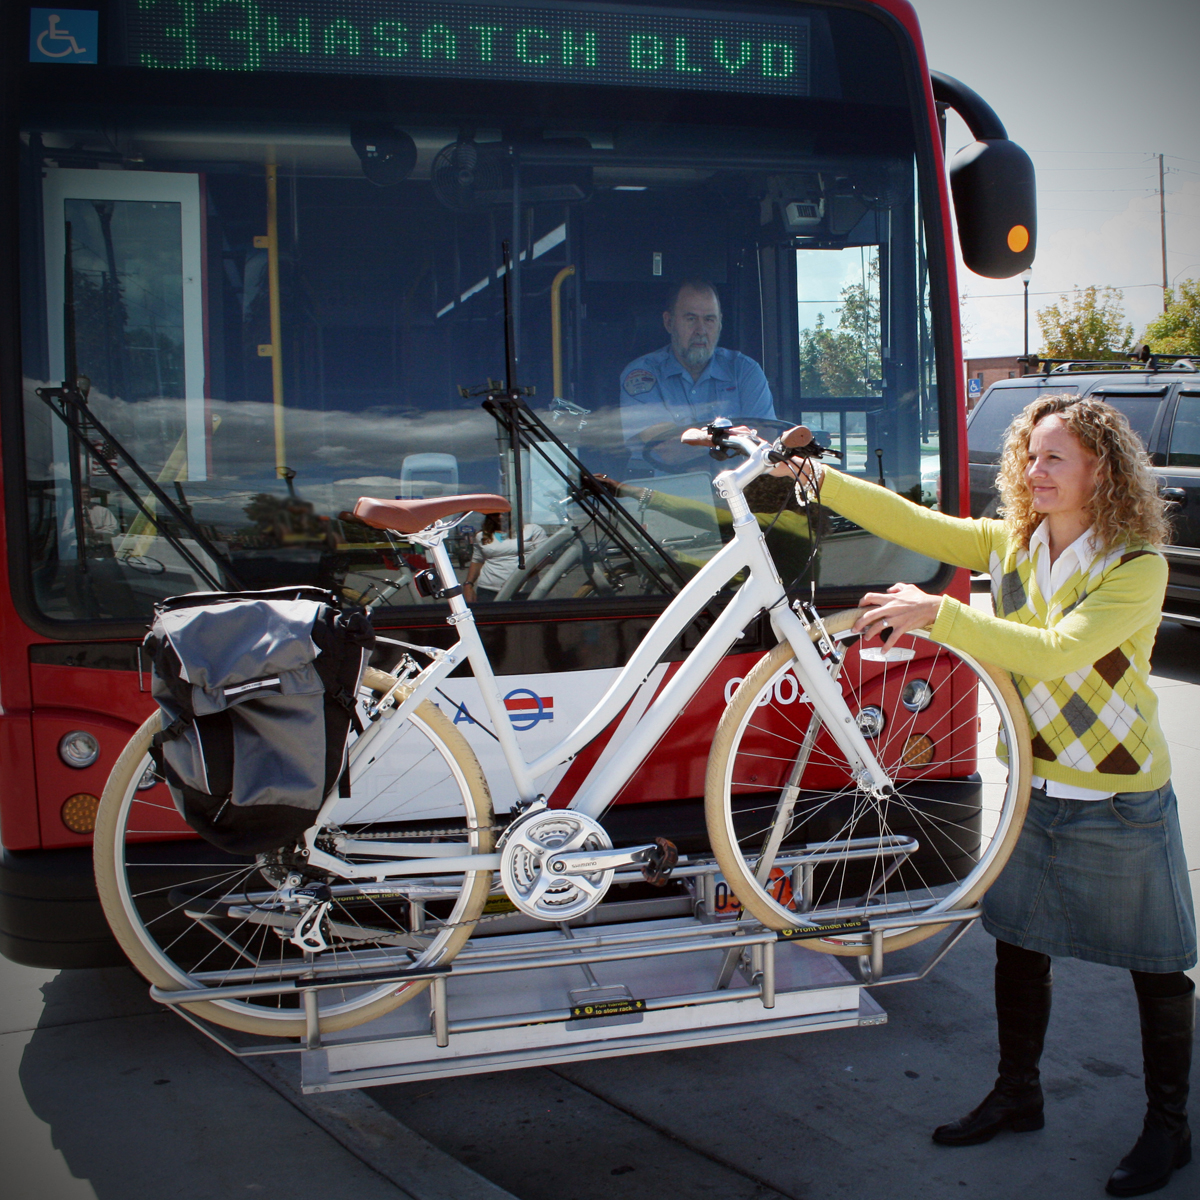
Combining bikes and public transportation is a great way to get to work. All new UTA buses will hold 3 bikes. Photo: Jessie Keller
Hybrid Commute
The Route: A long-distance commute made a lot easier by combining public transportation such as a bus or train or with your bike commute. This can include riding your bike to the terminal and locking it up on a rack or in a bike locker before getting on the public transportation or alternatively taking the bicycle with you; or even using a GreenBike in Salt Lake City to travel from the transit station to work and back. If the weather has suddenly turned bad or you have a hilly route home, use public transportation to make the homeward commute an easier one.
The Bicycle: It depends on the length of your bike commute, but a light bike that can be lifted onto the front rack of a bus with relative ease is practical. A folding bicycle may be more practical when there is no room on the train/bus for a bike.
Extra Accessories for the Bike or Commute: If you have a folding bike, you’ll want a messenger bag or backpack to carry what you need. Otherwise, have your bicycle equipped for the type of commute you have.
Clothing: Dress appropriate for the commute. If you have a folding bike, it will not likely have a chain guard, so wear an ankle band around your pant leg if necessary to keep it from catching in the chain.
Special Tip: It really isn’t difficult to get the bike onto a front-loading bike rack on a bus. To make it easier, the directions are literally spelled out on the stickers and first-timers would be surprised to find out how easy it is to put your bike on the bus and go! If you are taking your bike on the train, look for the specially marked train car which will be equipped for bike storage.
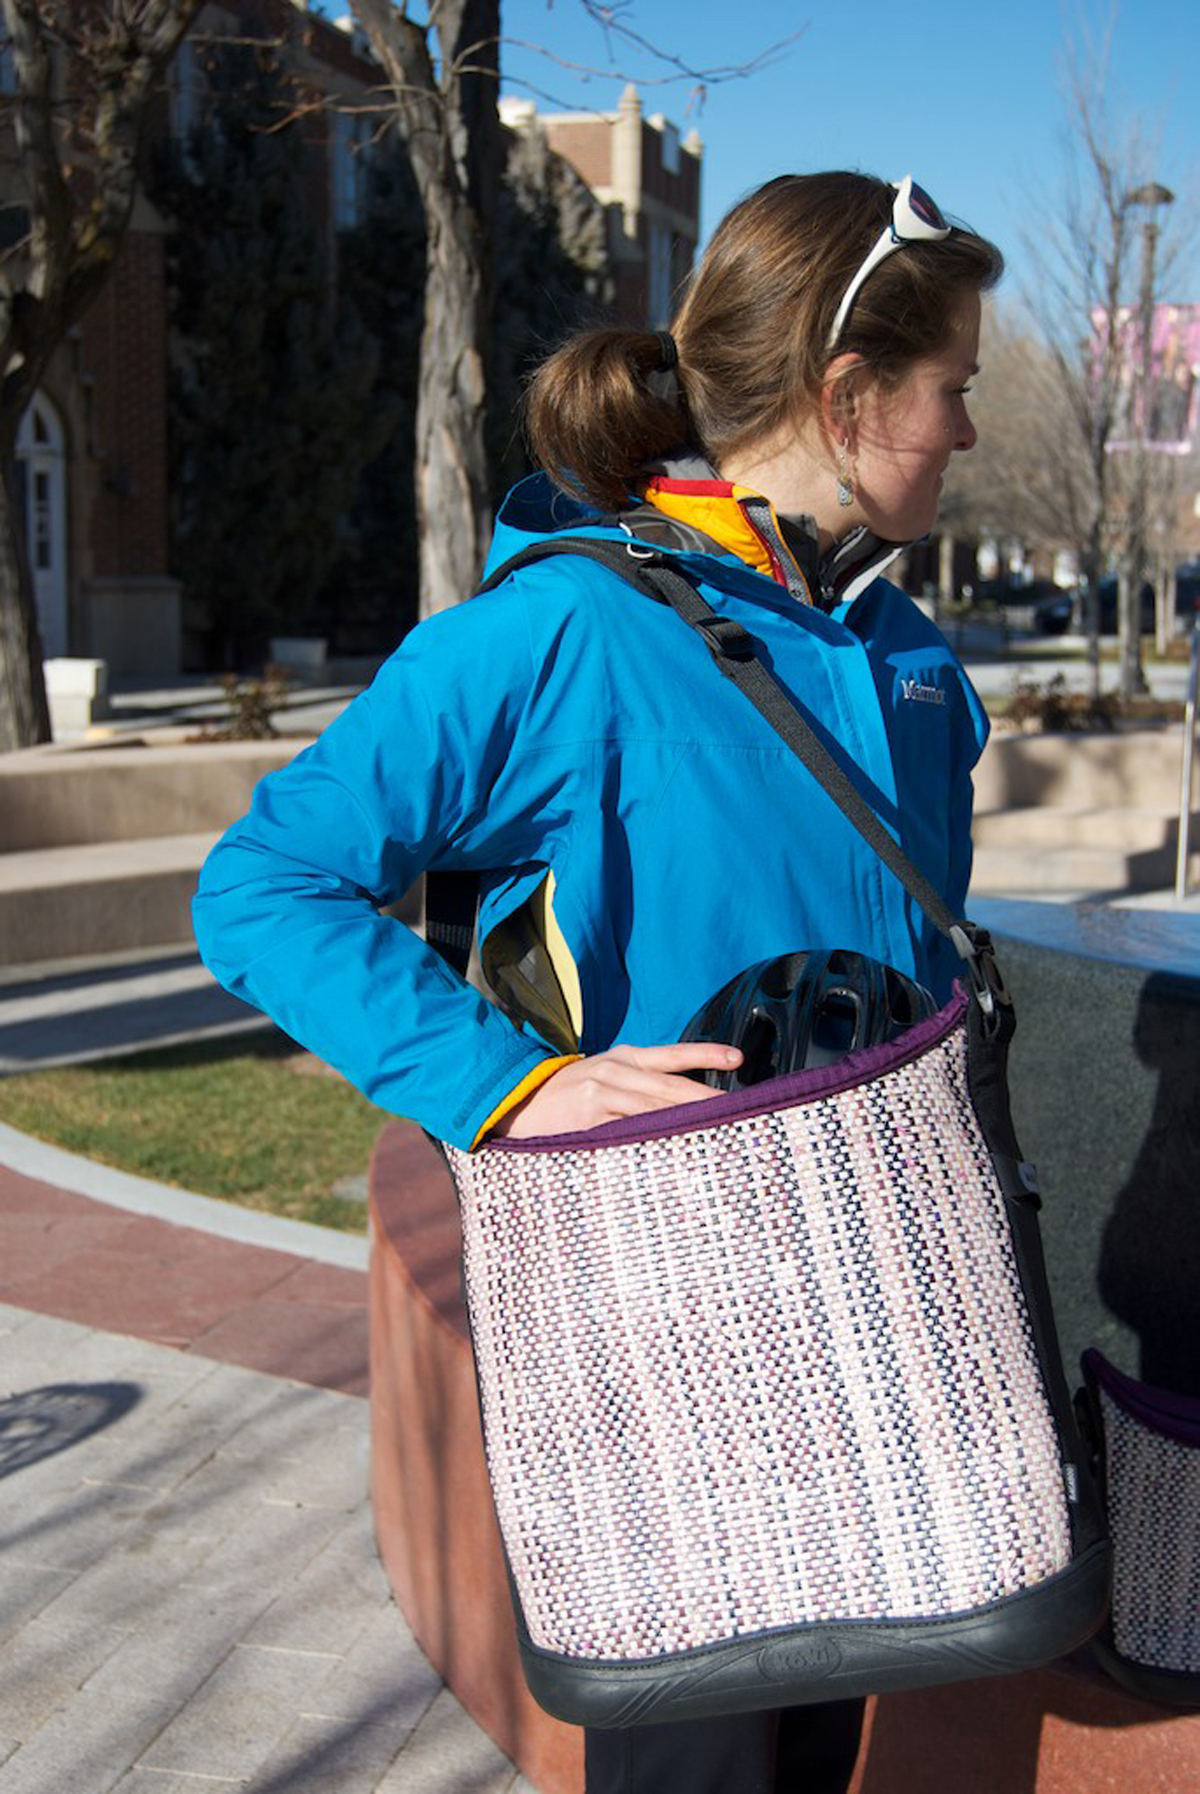
Shoulder bags are a good option for carrying stuff on a shorter commute. Photo by Beth Runkle.
Campus Commuter
The Route: Usually the route is a relatively short ride from apartment, sorority, dormitory or house to college or university campus. It may involve a hill, perhaps two, but usually nothing significant.
The Bicycle: Choose a bike that is a nice fit for student budget; nothing flashy to attract thieves, but just comfortable and nice enough that you will enjoy riding it. A step-through frame is easier for getting on and off the bicycle when wearing a skirt. If you have an older mountain bike that you are making over as your get-around bike, change the knobby tires for “Slicks”—smooth tires that will make riding on the pavement easier, smoother and faster.
Accessories for the Bike or commute: Buy a bike with a chain guard if you want to be able to wear wide-leg pants or not worry about the occasional chain grease on your leg. A good-quality, strong lock is necessary to deter theft. A fixed flat basket, in which books can be strapped in, can help balance the load so it isn’t all on your back. A front basket needs to be difficult for thieves to easily take off.
Clothing: Dress in comfortable clothing appropriate for class and the weather. A light, easily packable windproof jacket is perfect for stashing when no longer needed.
To Pack: Books, school supplies, and a laptop. You may already have a backpack that carries these nicely, but if you get a sweaty back from the backpack, a messenger bag may be preferable. Keep a small make-up bag and brush or comb for touch-up as needed.
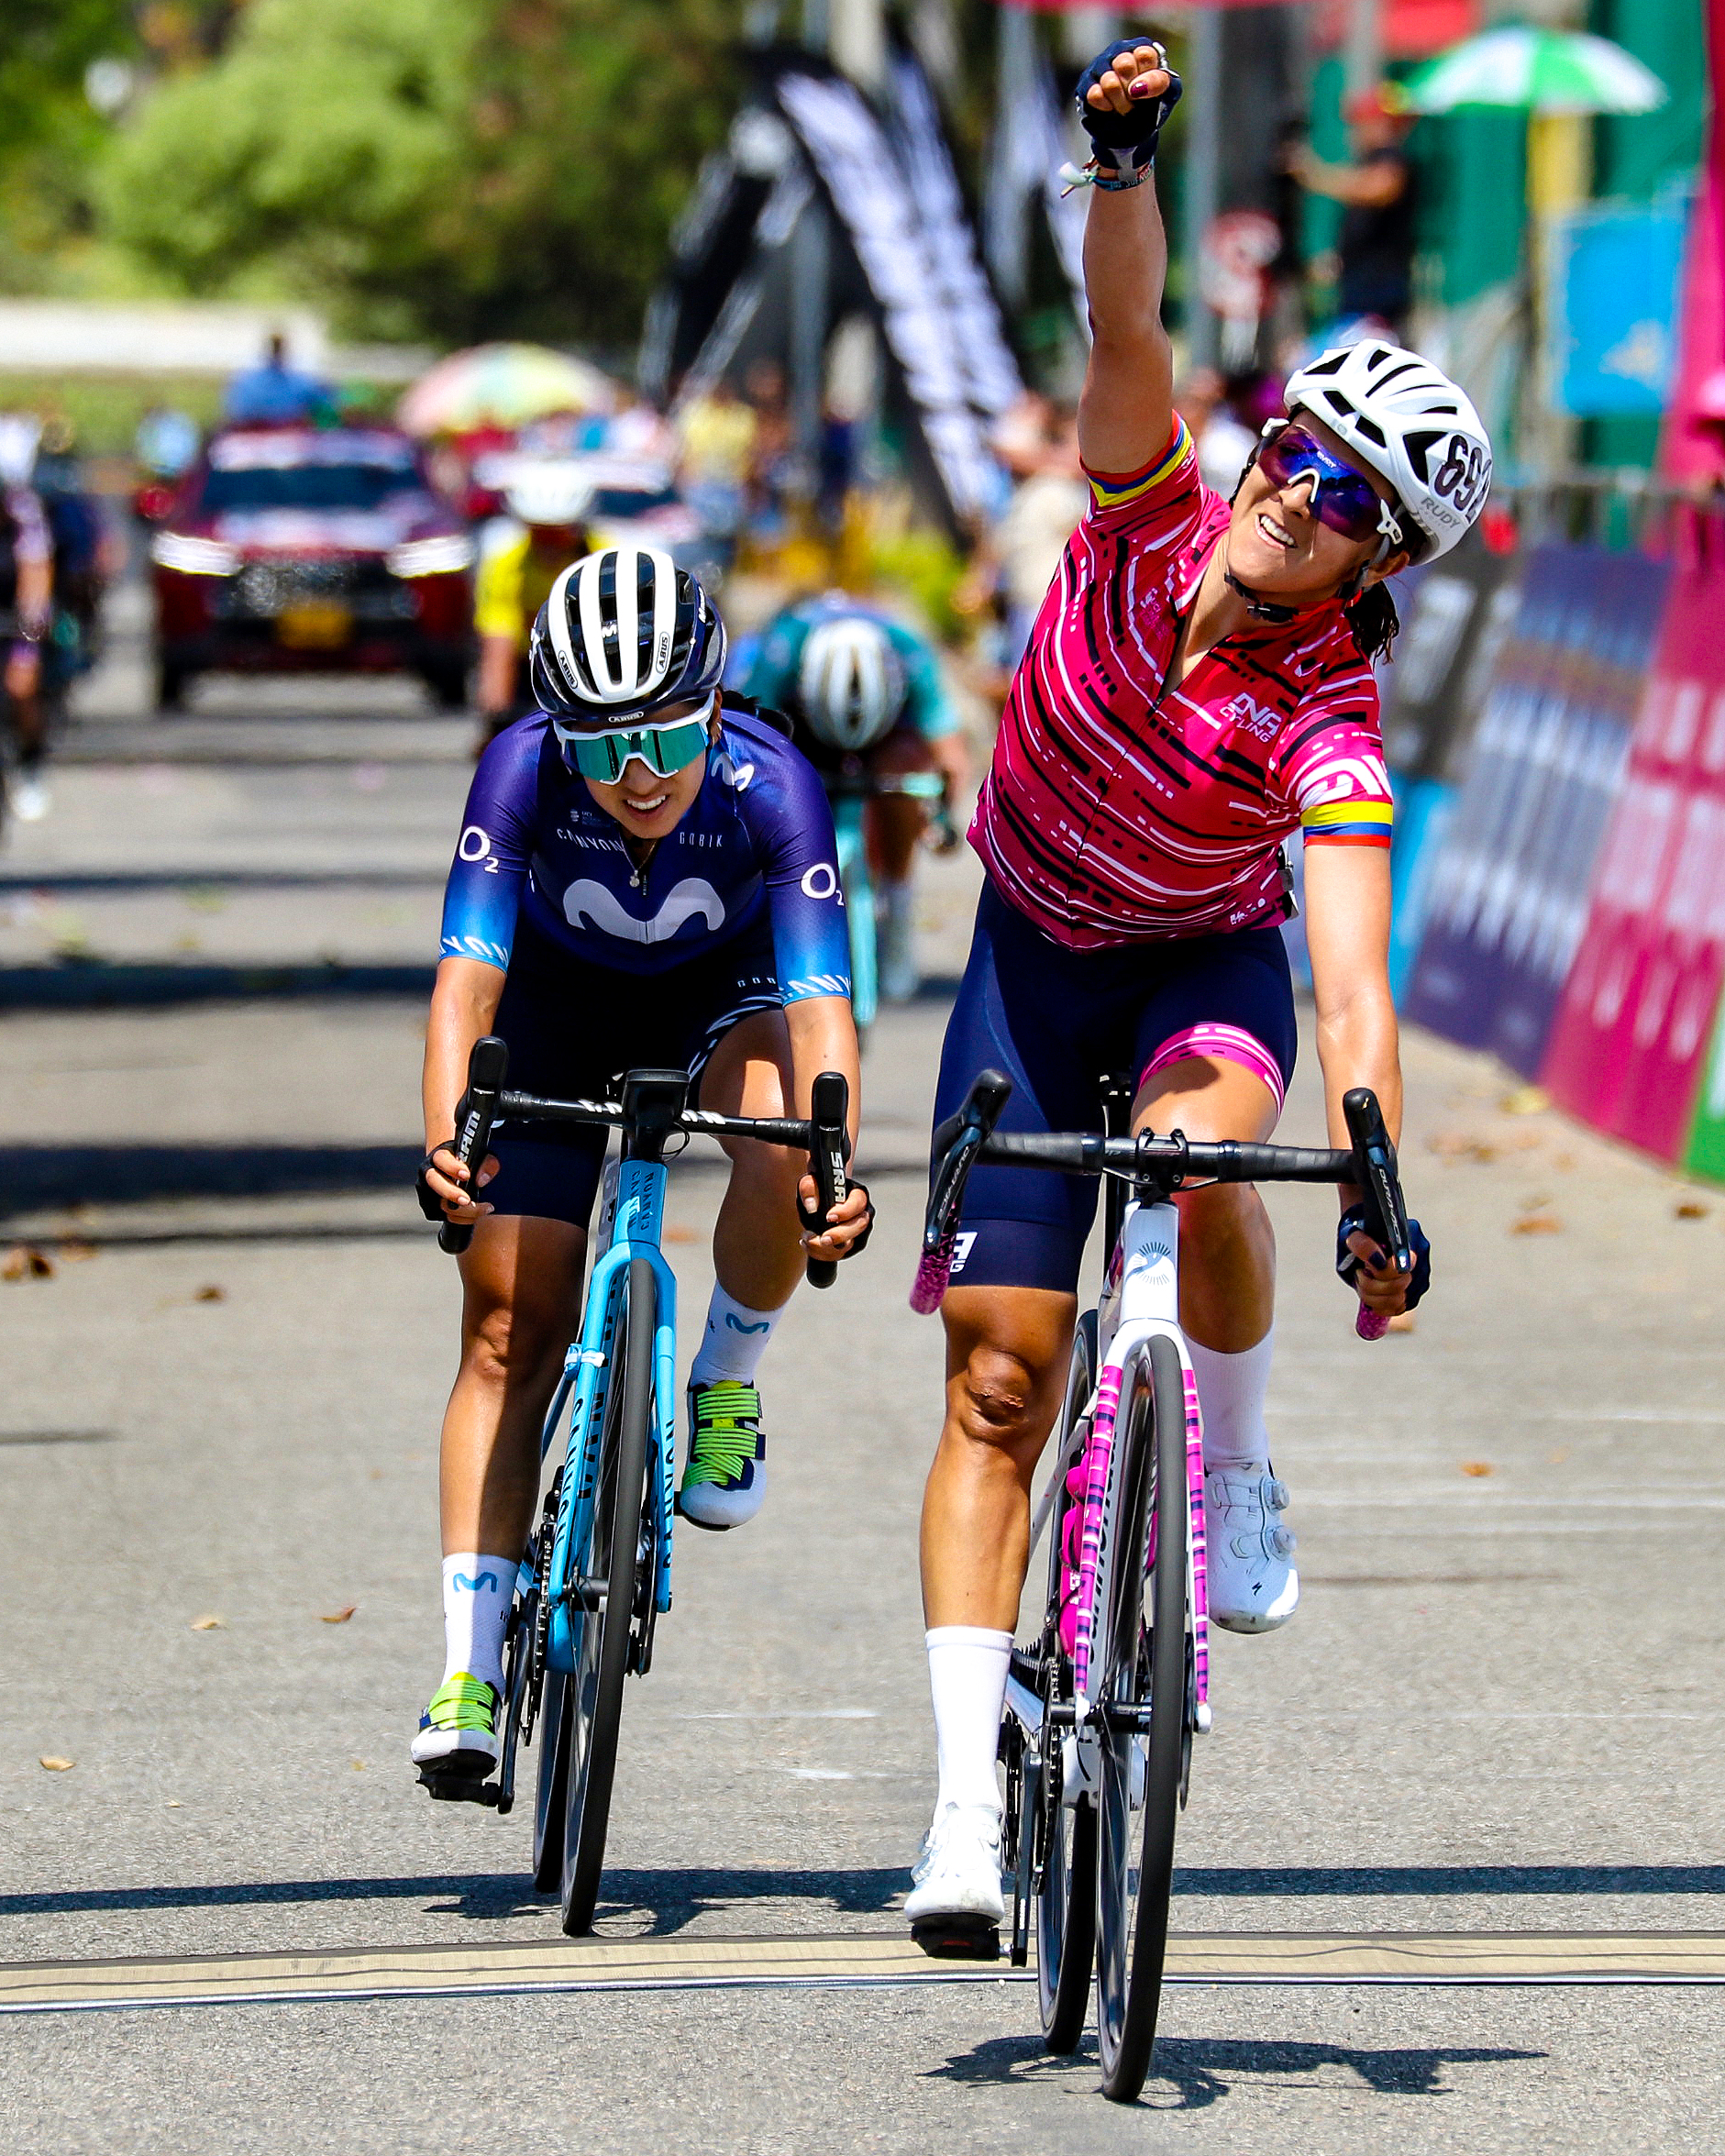
BUCARAMANGA, Colombia (February 3, 2023) — Diana Peñuela rounded the final corner, outkicking Paula Patiño (Movistar Team) in a thrilling sprint to successfully defend her Colombian national road title on Friday. Peñuela’s win in Bucaramanga came a day after earning a silver medal in the individual time trial championship as the 36-year-old embarks on her second season with DNA Pro Cycling.
Diana Carolina Peñuela (DNA Pro Cycling) successfully defends Colombian National Road Race Championship title, beating Paula Andrea Patiño (Movistar) in the final sprint. Photo Credit: Anderson Bonilla (@andersonbonilla01)
“There is nothing better than having the opportunity to represent the tri-color national champion jersey around the world,” Peñuela said following her second consecutive victory. “Last year, I put forth almost a desperate mental and physical effort, after coming so close for many years. The plan this year was to have patience, to know which break and attacks to control, and of course, to mark riders like Paula (Patiño) and Natalia (Franco), who are very strong. I stuck to it, kept a cool head on my shoulders and everything turned out great.”
Peñuela spent much of the offseason training at home in Colombia, preparing for her first objective of the season. Much of the championship circuit was held on the same roads as the final stage of last season’s Vuelta a Colombia, where Peñuela won 4 stages and the general classification.
“December and January were good months for training with little rain, so I was able to put in a solid block of training … I knew it was going to be tough. I knew I had to have the speed to stay with multiple attacks, be able to climb with the best, and have reserves for the final sprint,” she said.
The victory came in the final 50 meters of the 118.5km circuit race that included 5 times up the Alto Parqueadero climb with an average 8% gradient. Towards the end of lap 3, three riders escaped– Lina Rojas, Carol Henao, and Karina Flores – this breakaway later grew to 10, with both Peñuela and Patiño joining. Natalia Franco, who races with the UCI WCC Team, was also part of this break. Franco broke away solo on the penultimate lap but was caught on the final climb before a remaining group of 8 raced to contest the finish.
“When you’re on your own in a race, versus with teammates, you must consider strategies and tactics very carefully. I’ve gained more experience each year, and with the pre-race direction from Cathy and Jack (DNA Pro Cycling directors), I was able to approach the race more calmly and with a plan,” Peñuela said.
The 2X Colombian National Road Champion will have the opportunity to race in her national jersey as she begins her 8th season racing professionally.
“This was my first objective of the season. Not only for my trade team, but also to be part of the Colombian National Team to race in the Pan American games,” she said. “I’m looking forward to an exciting season with DNA Pro Cycling, with upcoming races in the United States and Europe. I’m especially looking forward to supporting our new young riders and hopefully help them to secure results.”
By Charles Pekow — Shared micromobility ridership took a big hit in North America during the first year of the pandemic but rebounded in 2021, according to a report from the National Association of City Transportation Officials. In 2021, “people took 47 million trips on station- based bike share systems, 62.5 million trips on dockless e-scooters, and 2.5 million trips on dockless bikes in the U.S.—a sharp contrast with 2020, when people took only 65 million trips across all shared micromobility modes,” says Half a Billion Trips: On Shared Micromobility Since 2010.
Bike share. Cartoon by Andy Singer
The pandemic caused a blip in growth of shared bike, ebike and scooter rides starting with a documented 321,000 rides in 2010, right after the concept was introduced. The 112 million rides in 2021 still fell below the peak of 136 million in 2019.
By Charles Pekow — The potential of cargo bikes lies largely untapped. Electric Cargo Bikes in Urban Areas: A New Mobility Option for Private Transportation says “adoption of e-cargo bikes as a valid transportation mode is still very limited worldwide. Although cycling has been pushed as a sustainable mode of travel in cities by multiple organizations and governments, cargo cycling has not been part of the conversation.”
Cargo bikes are cleaner than trucks when moving goods from one place to another, especially short distances. Photo by Dave Iltis
Electric cargo bikes can help riders carry a lot of weight, but a variety of factors are keeping use down, from cost to safety concerns to how far you can go on a charge and lack of appropriate infrastructure for riding and parking, says the study, published in Transportation Research Interdisciplinary Perspectives.
The study looked at previous research which stated that the typical cargo ebike user is young, well-to-do and male. Other demographics didn’t seem interested. Studies differed, however, in reporting the percentage of users were likely to own a car. But users generally expressed concerns about the environment as a motive for riding.
Previous studies also differed in how far riders typically went and how much time they spent on the bikes. Frequency of trips depended on the use. Few of those who used cargo bikes on a sharing system use them more than once a month. Frequency ranged for those who owned their own, just like it would for those with conventional bikes, from monthly or less to nearly daily.
By Lou Melini — Mention a kickstand to a bike snob and you will most likely receive a very succinct unflattering response. However talk to someone with a loaded touring bike, or a commuter bike that is about to have its’ panniers packed with groceries and you will be told about the utilitarian necessity of a kickstand. I know you are going to say that I could simply lean my bike against something. By saying that, it shows that you have never used a kickstand. Once you use a kickstand for a period of time you will find that it becomes a needed accessory.
The insults thrown at kickstands have resulted in an absolute dearth of kickstands in stock in an American bike shop save the rare bike shop. In Germany I measured 12 square feet of display space allotted to kickstands in a very large bike shop. Probably 70% of the 2000 bike inventory in that shop was made up of heavy bikes that came standard with lights, racks, fenders and kickstands, so having after-market kickstands in that environment was not only appropriate but a necessity. Ask an American bike shop employee for advice or a recommendation for a kickstand and you will probably receive a shrug and be shown a page in a Quality Bike Parts catalog. My son laughs when I get excited over purchasing a new kickstand. I have used 3 styles of kickstands over the years, which I believe constitute all categories of kickstands. There are some minor variations within each category.
Greenfield Rear Kickstand. Photo by Lou Melini
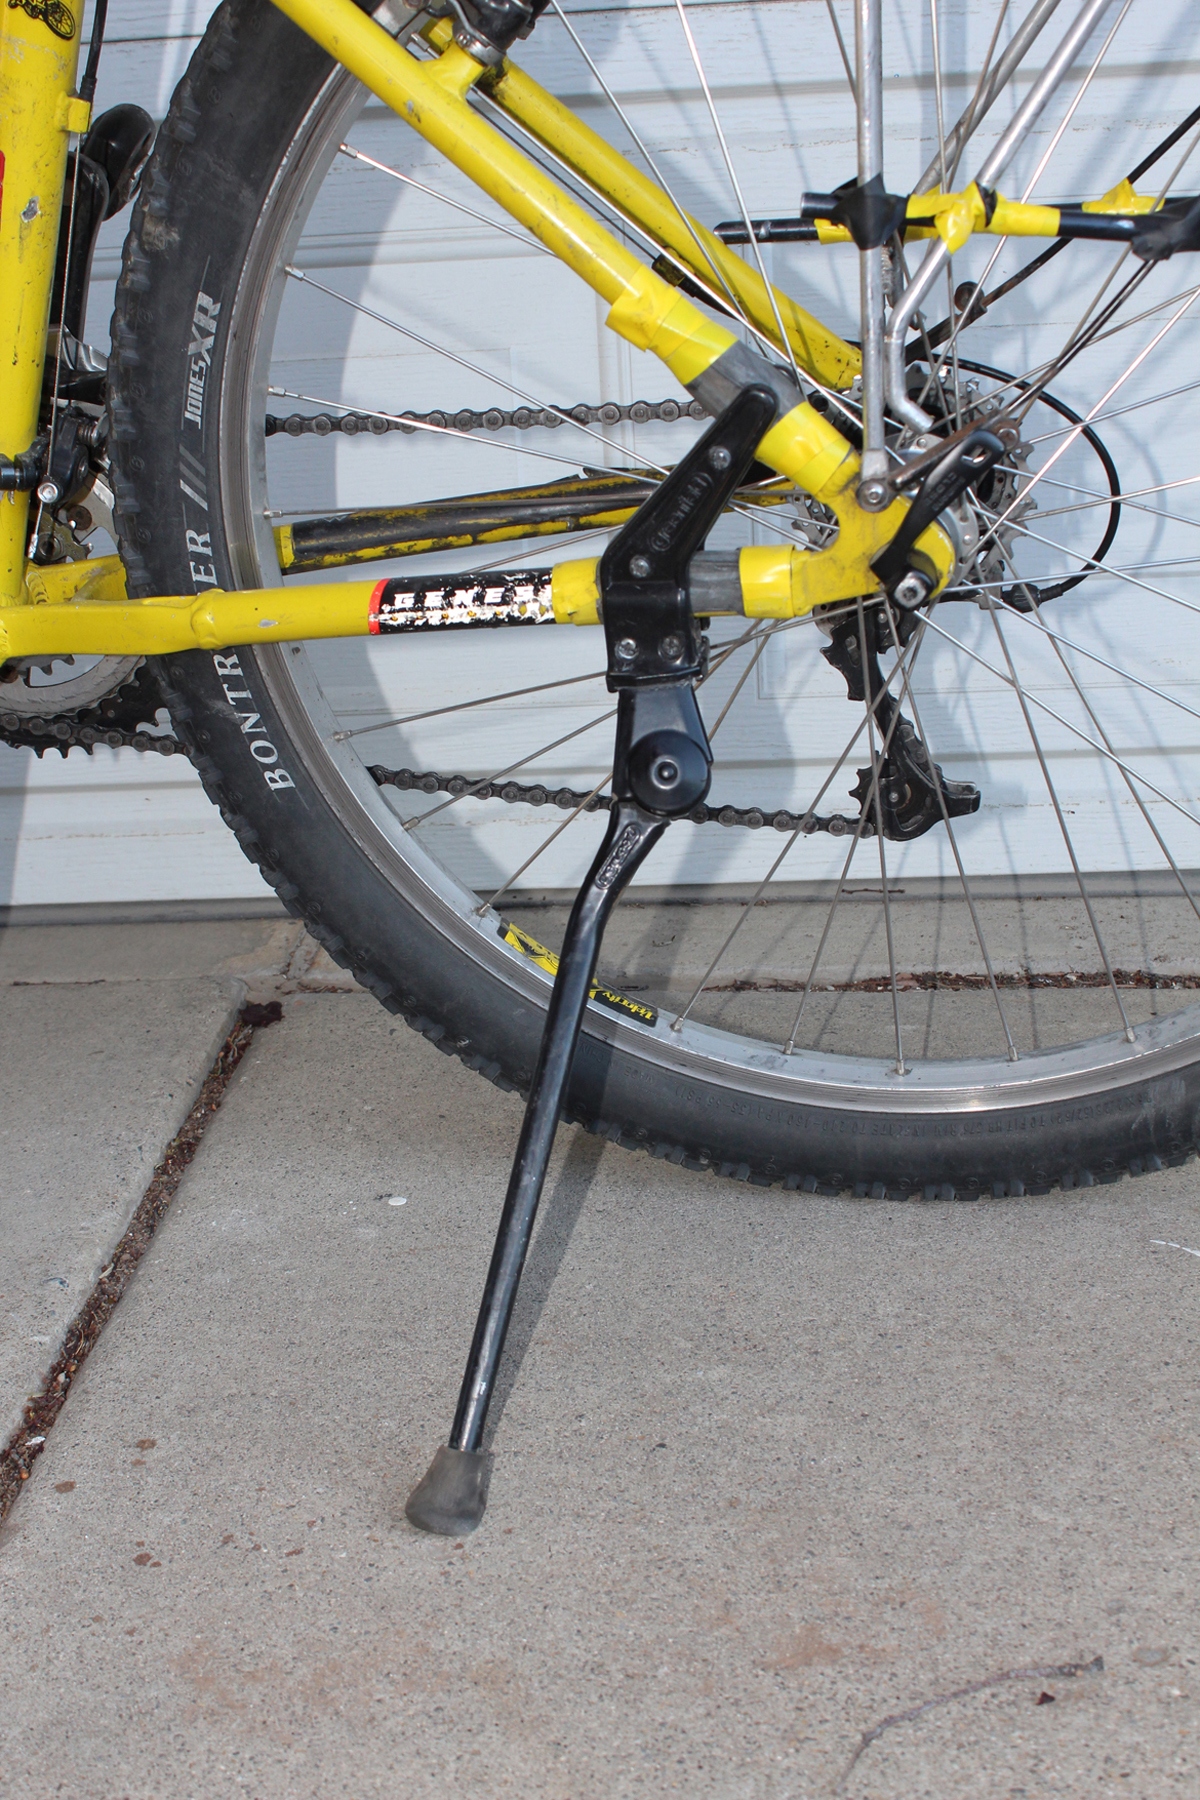
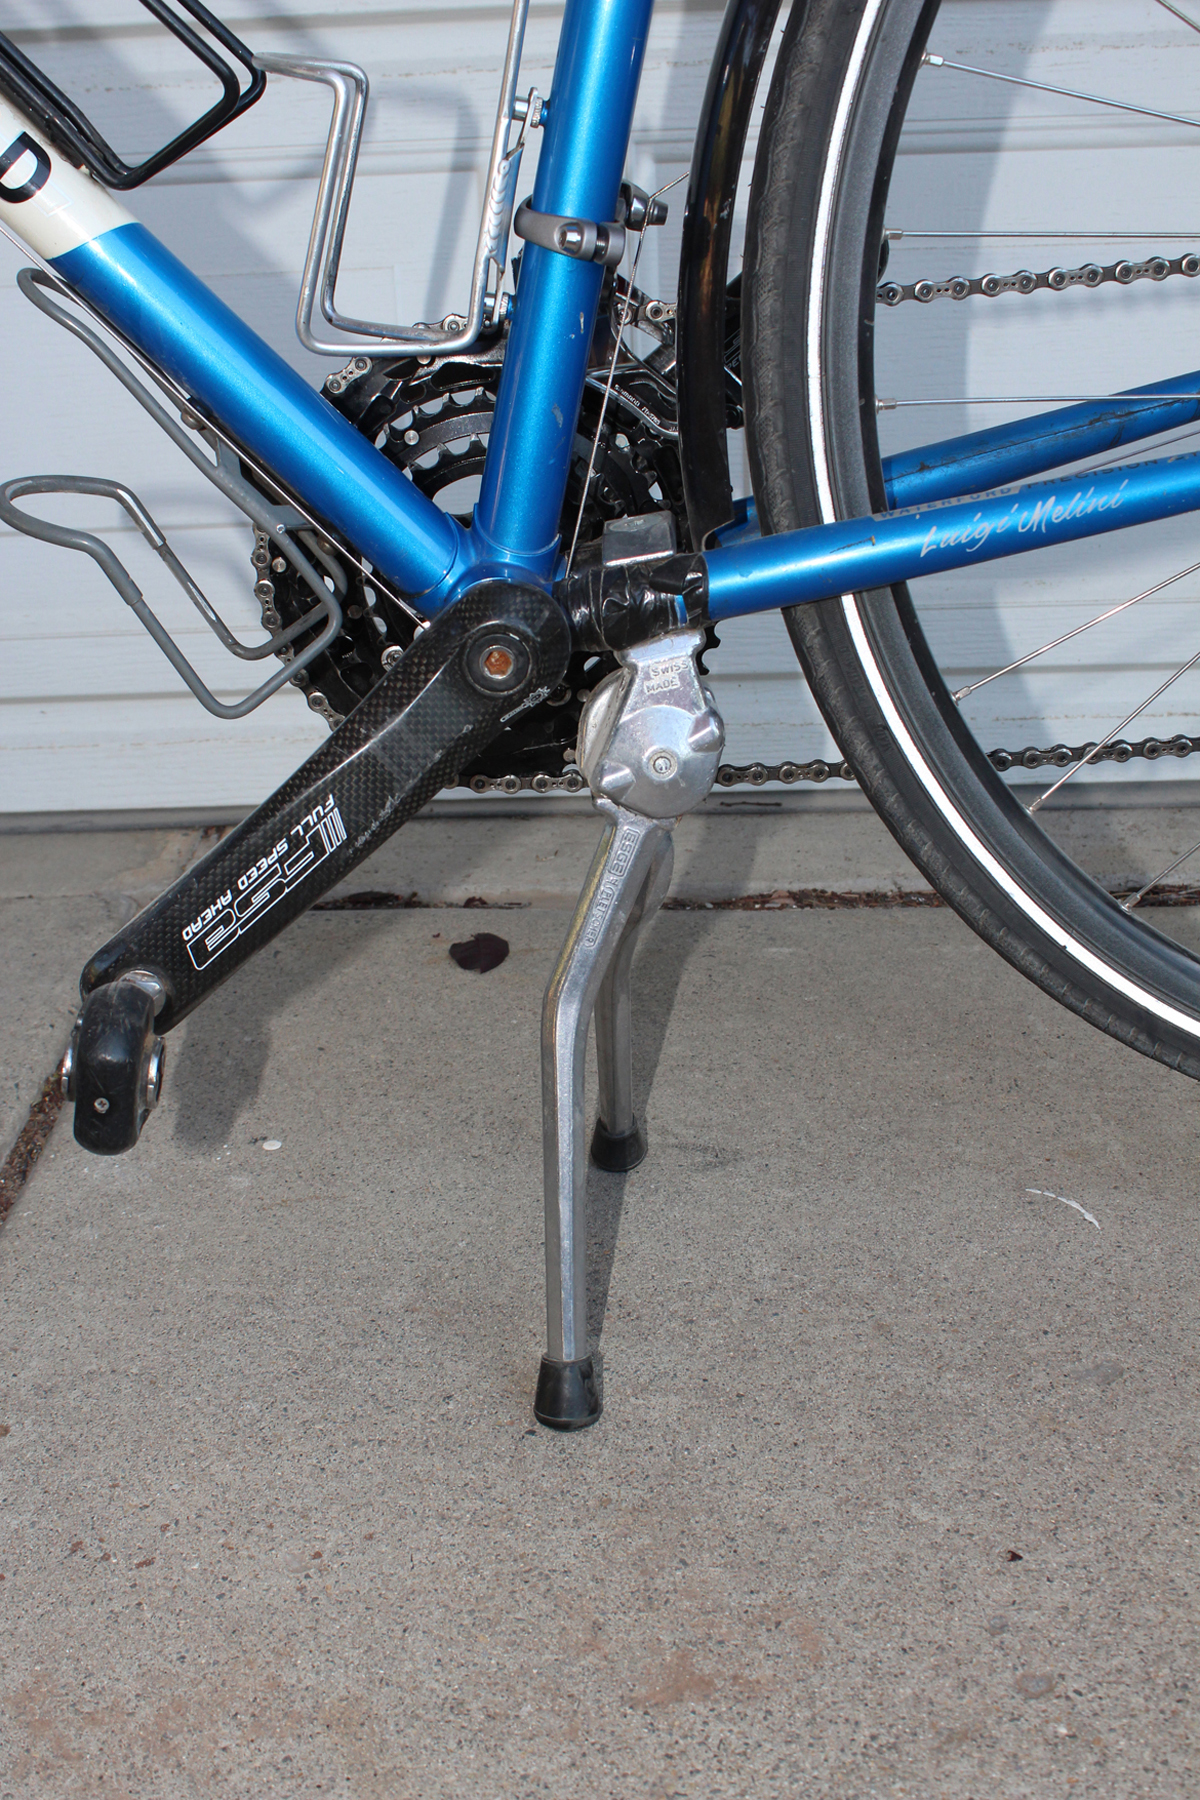
The first style kickstand I ever used is rear mounted. Basically this clamps to the seatstay and chainstay of your bike via 2 arms and several screws. This is the easiest to use. Simply flick the kickstand arm down with your foot and lean the bike. You can buy adjustable and non-adjustable legs but I personally do not have a preference, as both seem to work well. I have packed over 50 pounds of groceries in my rear panniers and on the rack without a problem. You will need to pack the kickstand side pannier first. There are a few downsides of this kickstand. If you want to mount a Burley style trailer to your bike the kickstand will get in the way. In addition, disc brakes may make the distance between the stays of your bike too wide for this style kickstand. There is really no maintenance except an occasional need to tighten the screws. Locktite will help. I have used a Greenfield brand (non-adjustable) and a TranzX kickstand; each of which cost me around $17.
Pletchser under bottom bracket. Photo by Lou Melini
The next style I purchased for my touring bike fits under the chainstay. It has 2 legs that swing down stabilizing the bike in a vertical position. This kickstand clamps to the top and bottom of your chainstays in front of the rear tire. For this style of kickstand you push down the legs of the kickstand and then lift the bike onto the extended legs. The primary advantage of this style is that I can work on my bike for routine maintenance during an extended tour. It is quite stable with the 45 lbs of camping gear carried in my front and rear panniers and on the rear rack. My kickstand is Swiss made Pletscher model so it is a little pricey at $45 but I figured that being able to work on my bike was worth a little extra and Swiss quality isn’t cheap. I did assume wrong that Swiss quality would make it indestructible as the return spring broke after about 7,000+ miles. There is also a Greenfield kickstand that uses similar technology that I have not used.
The legs of the Pletscher kickstand have markings up to 300mm. You then cut the legs to fit your bike, though I am unsure if this is absolutely necessary. Simply measure from the middle of your chainring bolt to the floor (270 mm for my touring bike) and cut the legs at the 270 mm mark (my bike) on the kickstand legs. Rivendell bikes (www.rivbike.com/product-p/k21.htm) have a detailed instruction on how to cut the Pletscher kickstand. Rivendell also have rubberized mounts (to protect the chainstays) and “feet” for the kickstand legs. You can also use handlebar tape or an old tube to protect the chainstays and for the legs you can buy 0.5 inch rubber furniture “feet” (from Ace Hardware). You can also buy a single leg under the chainstay Pletscher kickstand.
Using this kickstand as a work stand or using it to keep the bike upright while changing a flat tire is remarkably more convenient when touring. It beats turning the bike upside -down or finding a low branch to hook the saddle to. I do have to carry a separate 6mm wrench for the kickstand, as my multi-tool is too bulky to fit in the tight space. My wife’s kickstand seemed to come loose too frequently, but has not come loose since I reinforced the kickstand body to the chainstay bridge with zip-ties.
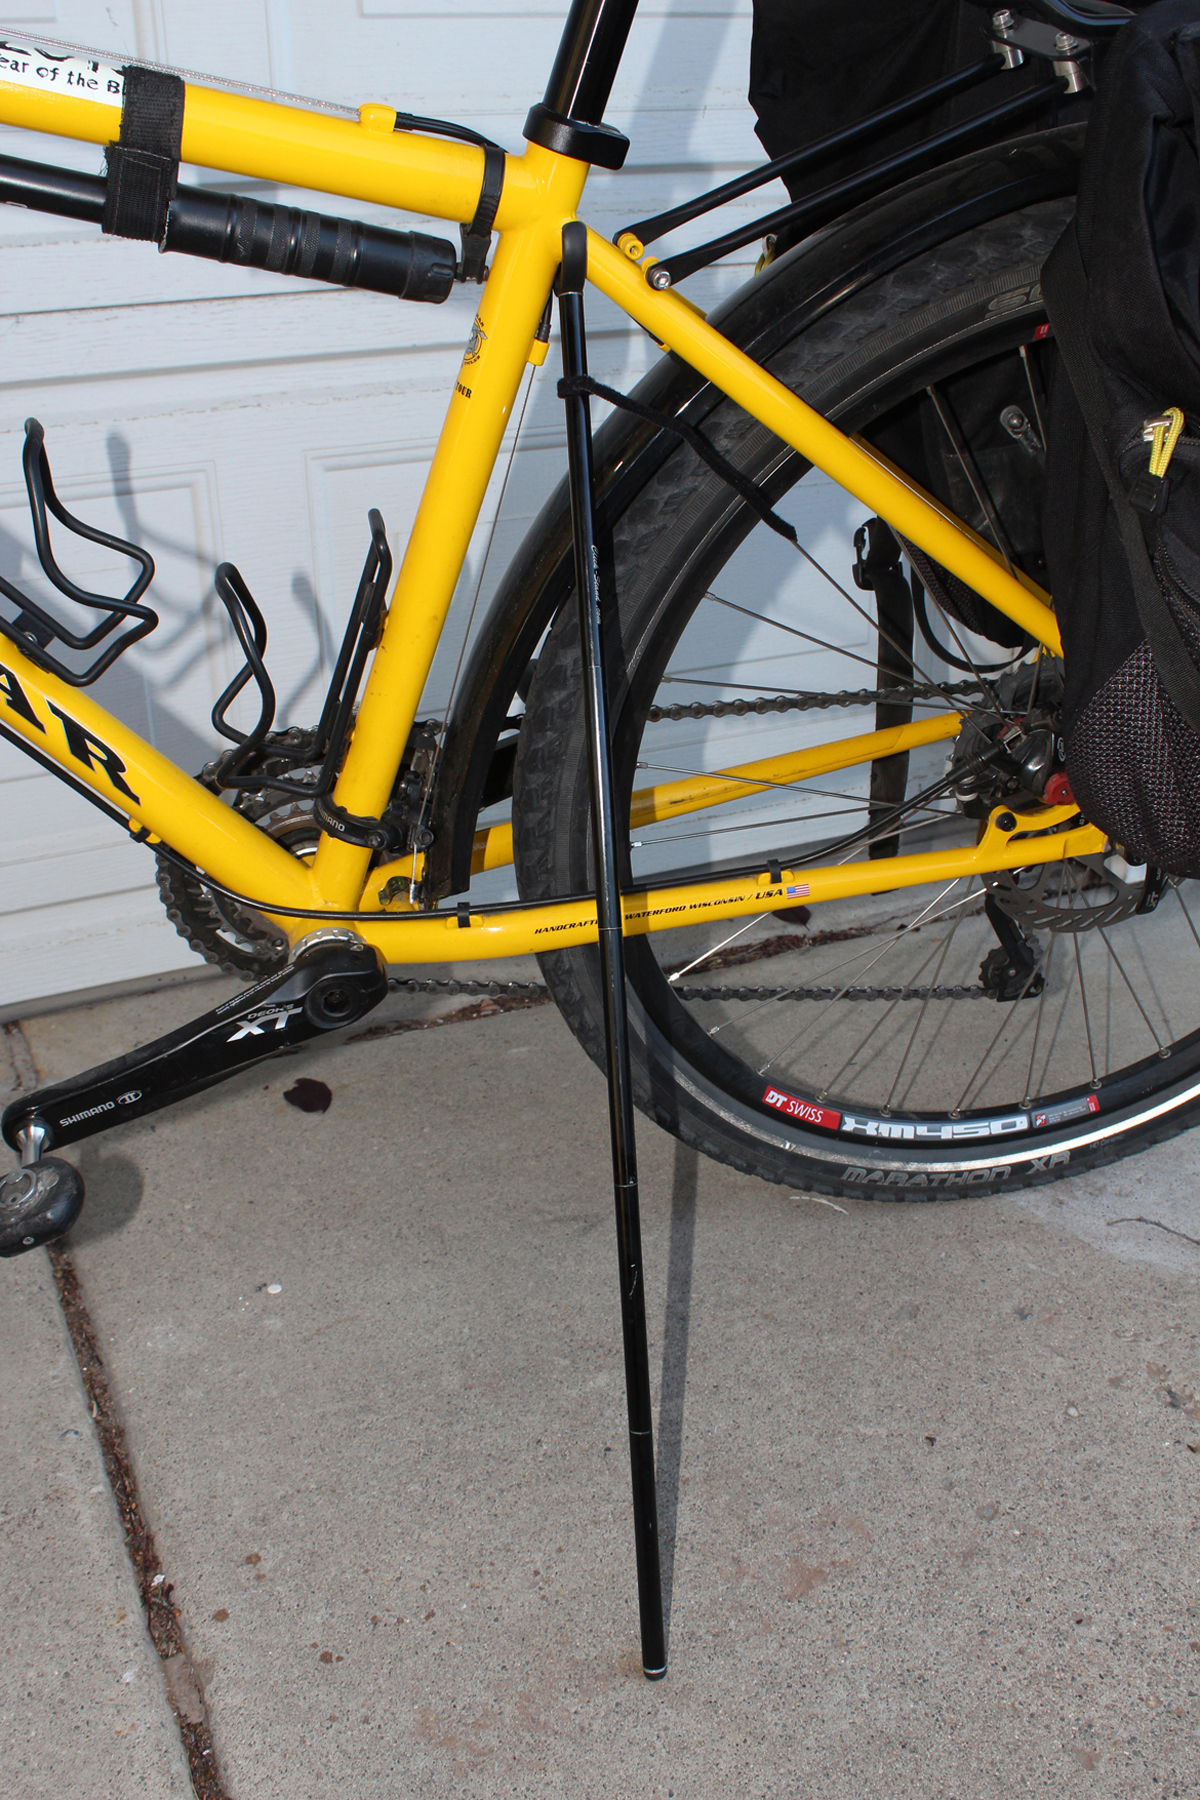
Click-stand. Photo by Lou Melin
The third style of kickstand I needed to purchase because my new commuter bike doesn’t accommodate kickstands, a story as to why I can discuss over a cup of coffee sometime. So if you have a bike that will not fit either of the above styles of kickstand then you will need a non-attached bike stabilizer. (Or if you want the function of a kickstand but wouldn’t be caught dead with one on your bike) The Click-Stand (Click-Stand.com) is basically a tent pole with a U-shaped attachment. The “U” is placed under the top tube or some other part of the bike and the bike leans into the tent pole. I’ve had a number of European bike travelers that have made their own bike stabilizer. The Click-Stand that I have folds down to 6 inches. It works well. After receiving it I had a large grocery list that I confirmed the weight to be 50 pounds. The entire shopping load was put into my panniers and strapped to the rear rack. With a bit of skepticism, one small adjustment, the bike held up. Good product!
I purchased my Click-Stand.com for $38. Prices vary a little for the lighter or heavier duty model (I have the heavy duty) and if you want a 4, 5, or 6 piece Click-Stand. Other than length, I’m not sure if there are any advantages for the 4, 5, or 6 piece lengths. I bought the middle-of-the-road 5-piece length which cost and extra $3 over the 4 piece. You can also buy an accessory to mount the Click-Stand to your water bottle bolts.
The website provides a detailed instructions on how to measure your bike when purchasing the Click-Stand as each are custom made for your bike. Tom at Click-Stand is very customer service oriented and will help you. The key to the stability of the Click-Stand is keeping the front brake engaged when using the Click-Stand. You will be sent 3 small bungee-cord loops to secure your brake with your order. Obviously this is the least convenient of the 3 types of kickstands that I own. I remove it from my pannier, assemble the shock-corded pole pieces similar to a tent pole, place it appropriately under my bike, and then lock the front brake. The Click-Stand is well worth the small amount of time to engage it, perhaps 10 seconds, for a simple quality product.
Be bold, trend setting and practical. Get a quality kickstand for your commuter or touring bike.
By Turner Bitton — After the close of the 2018 legislative session I caught up with Representative Brad Daw to talk about his experience as a commuter cyclist and legislator. Representative Daw has represented District 60 in the Utah House of Representatives since 2005 with a two year period between 2013 and 2015. District 60 is largely compromised of Orem and has historically been an area with significant growth.
Brad Daw commutes to work in Utah County. Photo by Brad Daw
Representative Daw has developed an interesting profile as a legislator and is known for working on policies ranging from the regulation of payday lenders to medical cannabis. He serves on the Higher Education Appropriations Subcommittee, House Government Operations Committee, House Health and Human Services Committee, Health and Human Services Interim Committee, and the Law Enforcement and Criminal Justice Interim Committee.
Here is our discussion.
Cycling West: You have a reputation for being a cyclist and supporting cycling issues on Utah’s Capitol Hill. Is it accurate to say so? Can you share your personal experiences with cycling?
Brad Daw: I do support cycling issues. Like any other legislation there’s always a balancing act, but in general I want Utah to be a place that welcomes and supports cyclists.
I have a bum knee from a severe childhood accident so running is off the table for me. But fitness is important to me and I wanted to embrace an activity that would challenge me without causing undue wear and tear on my knee. Bicycling turned out to be the ideal solution.
CW: I understand that you commute to work by bicycle. If this is true, what route do you take, and what is your motivation for commuting by bicycle?
BD: I do ride in to work more or less twice a week. My ride is the Murdock Trail from on end to the other. It is pretty ideal that I live in Orem and Adobe is at the other end of the trail. I like the commute for numerous reasons but the for me commuting is a great twofer. I get to do something productive beyond just having a workout. I get to actually get somewhere that I need to be for the day.
As a side note, I do not ride home. 20 miles in a day is a good workout for me. I take the FrontRunner home.
Brad Daw’s bike parking spot in the Utah State Capitol Building. Photo by Brad Daw
CW: I know that you live in Utah County but have you ever commuted to Capitol Hill by bicycle before?
BD: I did once this last session. I think I sent you the route I took in Strava. It was a 47 mile ride and I had a great time doing it. Here’s my bike in my parking spot at the capitol.
[Editor’s Note: Utah’s Idaho Stop Bill passed and was signed into law in 2021 and is now in effect, but without the red light portion which is covered in part by another section of the code. Cyclists can go through red lights after waiting for 90 seconds in certain circumstances.]
CW: During the legislative session the Utah House of Representatives passed House Bill 58 – the so-called “Idaho Stop” – which allows cyclists to treat stop signs as yield signs, and stop lights as stop signs. You voted for the legislation and I’m wondering if you have any thoughts on the bill.
BD: Well I just did it this morning. The fact is that if the road is clear I have no problem crossing and I do it all the time.
CW: You have served in the legislature since 2005. Do you feel the environment related to cycling issues has changed? If so, how and what has the impact been on cycling issues?
BD: There’s much more of a push on two fronts. One is simply clearing the way for more long distance bike paths like the Murdock and Jordan River Trail. And there is also more of an awareness of competitive cycling. The Tour of Utah is becoming a very big event and I hope it leads to more events both amateur and professional.
CW: Lastly, are there any issues or legislation you expect to see in the 2019 session related to bicycles? Do you plan on sponsoring any specific legislation related to cycling? Is there anything you would like to share with your constituents or our readers?
BD: I’m not aware of anything specific. Most of this seems like it would come under the heading of community and economic development. But if there needed to be some legislation I would most likely want to help it along.
I’ve always loved biking and hope to be able to do it for a long time and would encourage your readers and my constituents to get out and give it a try.
If you have an idea or individual subject for a commuter column in the West, please email [email protected]
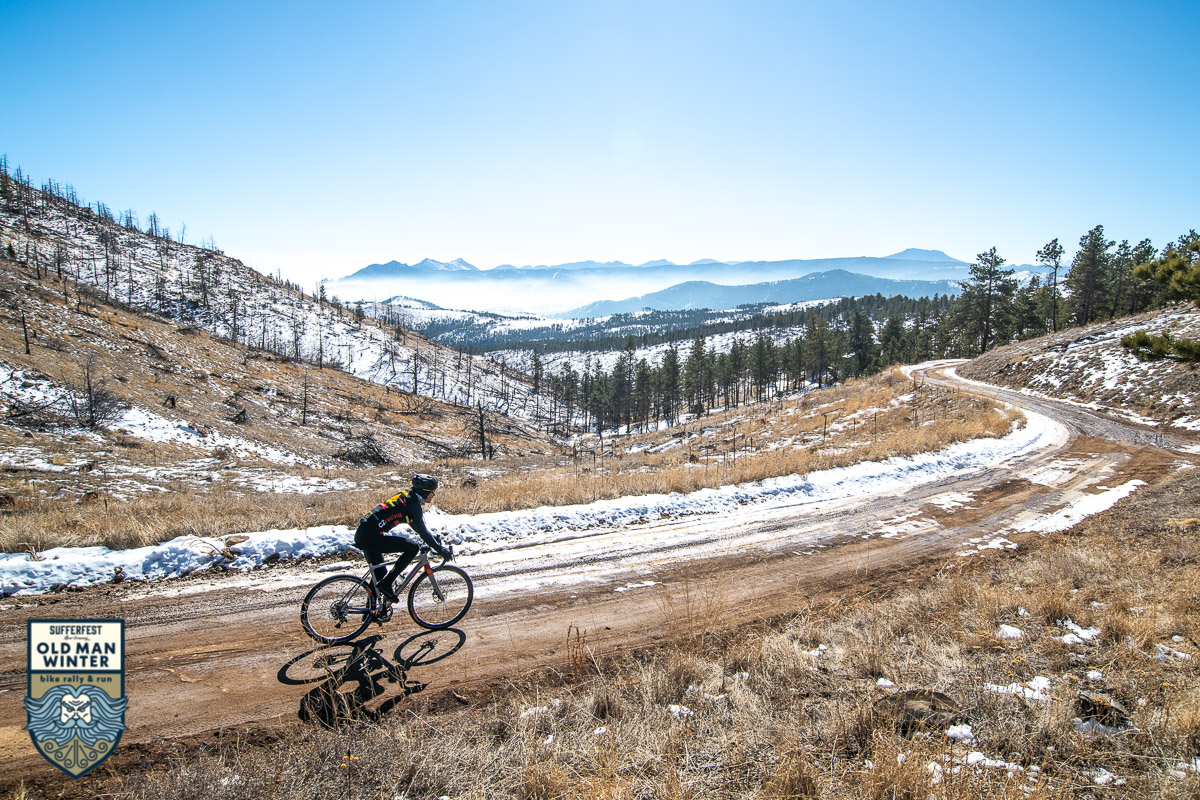
Now in its 9th year, this ‘Epic Winter Adventure’ has become the annual kickoff event for adventurous runners and riders from all over the country.
Photo courtesy Old Man Winter Rally
Need to know:
1,500 riders and runners from 27 states will take the start line in Lyons, Colorado on Sunday 2/5/23.
Elite riders and runners will compete for the $8,000 prize purse, including Jens Voight, Ruth Winder, and Alex House.
The Old Man Winter Rally has seen all kinds of weather from a blizzard to a record-high sunny day. The forecast for 2023 is mild with 40-degree temps with sun
This year, the event will move to a new venue, Bohn Park, a multi-million-dollar project completed in the wake of the historic 2013 floods.
5 categories: 50K Bike, 100K Bike, 10K Run, 5K Run, 10K Run / 50K Bike combo
Originally created as a way for friends to ‘rally’ together and support each other getting outside to ride on a wintry day, the Old Man Winter Rally has become one of the most popular running and riding events in Colorado. The event was built for folks that don’t hang up their bikes or running shoes during the winter and instead embrace the cold by bundling up and hitting the gravel roads and trails. “Old Man Winter is all about gearing up for winter adventure, having fun with your buddies, and enjoying a great party at the finish line” says, Josh Kravetz, the event’s founder and President of Adventure Fit, a Boulder-based Active Entertainment event company. “We like to make sure everybody has a fun day at Old Man Winter Rally – no matter what your athletic ability. This is Boulder, so you’ll see plenty of world-class athletes at the event, but we also love for this to be the first race ever for riders and runners.”
This Sunday, February 5th the event offers two bike course options: 50km and 100km, two run course options: a 5K and a 10K running race, and a Run/Bike combo that’s popular for winter multisport athletes. There will also be a huge celebration in Bohn Park for all at the after-party. And they do mean “party”. Athletes will cross the finish line and find fire pits, live music, delicious food (including s’mores) and Bootstrap Brewing Beer and June Shine cocktails.
2023 will have the biggest participation yet. The event will be capped at 1500 participants and less than 100 spots currently remain.
Old Man Winter History:
2015 – In the debut year, gravel bikes weren’t in fashion quite yet and future Tour de France stage winner Sepp Kuss nearly won on a road bike. Temps hit the high-60’s and high winds made for a breezy finish.
2016 – The running event is added, drawing in 188 participants in year one.
2018 – The course was revised due to construction, offering the first and only Northbound version which did not include the Rowena trail. Mat Stephens (winner of Unbound Gravel) and Lauren de Crescenzo (the winningest girl in gravel) taking the win.
2019 – The coldest year, never reaching above freezing throughout the whole event
2020 – A massive winter storm rolled through and ultimately, forced the cancellation of the 100K bike event 10 miles in. Riders were slipping and sliding in the epic conditions and despite the cancellation, the wild nature of it made it a monumental story in the race’s history.
2021 – One of the first COVID-friendly “DIY” style events to pick up steam, riders had the chance to ride the course with their pod, and get scored on a virtual scoreboard, or select a virtual option altogether. World Tour talents Alex Howes & Lachlan Morton teamed up and won the event.
2022 – The Rally returned from the pandemic full steam ahead, drawing in pro riders, everyday athletes and riders and runners from every background. Participants enjoyed a sunny 45-degree day
2023 – The Rally moves to a new venue, Bohn Park, a multi-million-dollar project completed in the wake the historic 2013 floods.
For those not competing, the top of the Rowena trail (off CO Rd 83) and Old Stage will be great spectating locations – showing off the variety of terrain the riders will challenge. Early February in Colorado can bring spring conditions, or mid-winter snow. A cool January and “sticky snow” will likely see a wintery route on tap. The after party in Lyons is open to all, with bonfires, s’mores, cold beer, and warm food. Join in on the winter adventure! Registration and additional event information is online at: www.OldManWinterRally.com